홈페이지 관련/Flex2008. 6. 21. 09:38

sqlite3: A command-line access program for SQLite databases

The SQLite library includes a simple command-line utility named sqlite3 that allows the user to manually enter and execute SQL commands against an SQLite database. This document provides a brief introduction on how to use sqlite3.

Getting Started

To start the sqlite3 program, just type "sqlite3" followed by the name the file that holds the SQLite database. If the file does not exist, a new one is created automatically. The sqlite3 program will then prompt you to enter SQL. Type in SQL statements (terminated by a semicolon), press "Enter" and the SQL will be executed.

For example, to create a new SQLite database named "ex1" with a single table named "tbl1", you might do this:

$ sqlite3 ex1
SQLite version 3.3.10
Enter ".help" for instructions
sqlite> create table tbl1(one varchar(10), two smallint);
sqlite> insert into tbl1 values('hello!',10);
sqlite> insert into tbl1 values('goodbye', 20);
sqlite> select * from tbl1;
hello!|10
goodbye|20
sqlite>

You can terminate the sqlite3 program by typing your systems End-Of-File character (usually a Control-D) or the interrupt character (usually a Control-C).

Make sure you type a semicolon at the end of each SQL command! The sqlite3 program looks for a semicolon to know when your SQL command is complete. If you omit the semicolon, sqlite3 will give you a continuation prompt and wait for you to enter more text to be added to the current SQL command. This feature allows you to enter SQL commands that span multiple lines. For example:

sqlite> CREATE TABLE tbl2 (
  ...>   f1 varchar(30) primary key,
  ...>   f2 text,
  ...>   f3 real
  ...> );
sqlite>

Aside: Querying the SQLITE_MASTER table

The database schema in an SQLite database is stored in a special table named "sqlite_master". You can execute "SELECT" statements against the special sqlite_master table just like any other table in an SQLite database. For example:

$ sqlite3 ex1
SQlite vresion 3.3.10
Enter ".help" for instructions
sqlite> select * from sqlite_master;
   type = table
   name = tbl1
tbl_name = tbl1
rootpage = 3
    sql = create table tbl1(one varchar(10), two smallint)
sqlite>

But you cannot execute DROP TABLE, UPDATE, INSERT or DELETE against the sqlite_master table. The sqlite_master table is updated automatically as you create or drop tables and indices from the database. You can not make manual changes to the sqlite_master table.

The schema for TEMPORARY tables is not stored in the "sqlite_master" table since TEMPORARY tables are not visible to applications other than the application that created the table. The schema for TEMPORARY tables is stored in another special table named "sqlite_temp_master". The "sqlite_temp_master" table is temporary itself.

Special commands to sqlite3

Most of the time, sqlite3 just reads lines of input and passes them on to the SQLite library for execution. But if an input line begins with a dot ("."), then that line is intercepted and interpreted by the sqlite3 program itself. These "dot commands" are typically used to change the output format of queries, or to execute certain prepackaged query statements.

For a listing of the available dot commands, you can enter ".help" at any time. For example:

sqlite> .help
.bail ON|OFF           Stop after hitting an error.  Default OFF
.databases             List names and files of attached databases
.dump ?TABLE? ...      Dump the database in an SQL text format
.echo ON|OFF           Turn command echo on or off
.exit                  Exit this program
.explain ON|OFF        Turn output mode suitable for EXPLAIN on or off.
.header(s) ON|OFF      Turn display of headers on or off
.help                  Show this message
.import FILE TABLE     Import data from FILE into TABLE
.indices TABLE         Show names of all indices on TABLE
.load FILE ?ENTRY?     Load an extension library
.mode MODE ?TABLE?     Set output mode where MODE is one of:
                        csv      Comma-separated values
                        column   Left-aligned columns.  (See .width)
                        html     HTML <table> code
                        insert   SQL insert statements for TABLE
                        line     One value per line
                        list     Values delimited by .separator string
                        tabs     Tab-separated values
                        tcl      TCL list elements
.nullvalue STRING      Print STRING in place of NULL values
.output FILENAME       Send output to FILENAME
.output stdout         Send output to the screen
.prompt MAIN CONTINUE  Replace the standard prompts
.quit                  Exit this program
.read FILENAME         Execute SQL in FILENAME
.schema ?TABLE?        Show the CREATE statements
.separator STRING      Change separator used by output mode and .import
.show                  Show the current values for various settings
.tables ?PATTERN?      List names of tables matching a LIKE pattern
.timeout MS            Try opening locked tables for MS milliseconds
.width NUM NUM ...     Set column widths for "column" mode
sqlite>

Changing Output Formats

The sqlite3 program is able to show the results of a query in eight different formats: "csv", "column", "html", "insert", "line", "tabs", and "tcl". You can use the ".mode" dot command to switch between these output formats.

The default output mode is "list". In list mode, each record of a query result is written on one line of output and each column within that record is separated by a specific separator string. The default separator is a pipe symbol ("|"). List mode is especially useful when you are going to send the output of a query to another program (such as AWK) for additional processing.

sqlite> .mode list
sqlite> select * from tbl1;
hello|10
goodbye|20
sqlite>

You can use the ".separator" dot command to change the separator for list mode. For example, to change the separator to a comma and a space, you could do this:

sqlite> .separator ", "
sqlite> select * from tbl1;
hello, 10
goodbye, 20
sqlite>

In "line" mode, each column in a row of the database is shown on a line by itself. Each line consists of the column name, an equal sign and the column data. Successive records are separated by a blank line. Here is an example of line mode output:

sqlite> .mode line
sqlite> select * from tbl1;
one = hello
two = 10

one = goodbye
two = 20
sqlite>

In column mode, each record is shown on a separate line with the data aligned in columns. For example:

sqlite> .mode column
sqlite> select * from tbl1;
one         two      
----------  ----------
hello       10        
goodbye     20        
sqlite>

By default, each column is at least 10 characters wide. Data that is too wide to fit in a column is truncated. You can adjust the column widths using the ".width" command. Like this:

sqlite> .width 12 6
sqlite> select * from tbl1;
one           two  
------------  ------
hello         10    
goodbye       20    
sqlite>

The ".width" command in the example above sets the width of the first column to 12 and the width of the second column to 6. All other column widths were unaltered. You can gives as many arguments to ".width" as necessary to specify the widths of as many columns as are in your query results.

If you specify a column a width of 0, then the column width is automatically adjusted to be the maximum of three numbers: 10, the width of the header, and the width of the first row of data. This makes the column width self-adjusting. The default width setting for every column is this auto-adjusting 0 value.

The column labels that appear on the first two lines of output can be turned on and off using the ".header" dot command. In the examples above, the column labels are on. To turn them off you could do this:

sqlite> .header off
sqlite> select * from tbl1;
hello         10    
goodbye       20    
sqlite>

Another useful output mode is "insert". In insert mode, the output is formatted to look like SQL INSERT statements. You can use insert mode to generate text that can later be used to input data into a different database.

When specifying insert mode, you have to give an extra argument which is the name of the table to be inserted into. For example:

sqlite> .mode insert new_table
sqlite> select * from tbl1;
INSERT INTO 'new_table' VALUES('hello',10);
INSERT INTO 'new_table' VALUES('goodbye',20);
sqlite>

The last output mode is "html". In this mode, sqlite3 writes the results of the query as an XHTML table. The beginning <TABLE> and the ending </TABLE> are not written, but all of the intervening <TR>s, <TH>s, and <TD>s are. The html output mode is envisioned as being useful for CGI.

Writing results to a file

By default, sqlite3 sends query results to standard output. You can change this using the ".output" command. Just put the name of an output file as an argument to the .output command and all subsequent query results will be written to that file. Use ".output stdout" to begin writing to standard output again. For example:

sqlite> .mode list
sqlite> .separator |
sqlite> .output test_file_1.txt
sqlite> select * from tbl1;
sqlite> .exit
$ cat test_file_1.txt
hello|10
goodbye|20
$

Querying the database schema

The sqlite3 program provides several convenience commands that are useful for looking at the schema of the database. There is nothing that these commands do that cannot be done by some other means. These commands are provided purely as a shortcut.

For example, to see a list of the tables in the database, you can enter ".tables".

sqlite> .tables
tbl1
tbl2
sqlite>

The ".tables" command is similar to setting list mode then executing the following query:

SELECT name FROM sqlite_master 
WHERE type IN ('table','view') AND name NOT LIKE 'sqlite_%'
UNION ALL
SELECT name FROM sqlite_temp_master
WHERE type IN ('table','view')
ORDER BY 1

In fact, if you look at the source code to the sqlite3 program (found in the source tree in the file src/shell.c) you'll find exactly the above query.

The ".indices" command works in a similar way to list all of the indices for a particular table. The ".indices" command takes a single argument which is the name of the table for which the indices are desired. Last, but not least, is the ".schema" command. With no arguments, the ".schema" command shows the original CREATE TABLE and CREATE INDEX statements that were used to build the current database. If you give the name of a table to ".schema", it shows the original CREATE statement used to make that table and all if its indices. We have:

sqlite> .schema
create table tbl1(one varchar(10), two smallint)
CREATE TABLE tbl2 (
 f1 varchar(30) primary key,
 f2 text,
 f3 real
)
sqlite> .schema tbl2
CREATE TABLE tbl2 (
 f1 varchar(30) primary key,
 f2 text,
 f3 real
)
sqlite>

The ".schema" command accomplishes the same thing as setting list mode, then entering the following query:

SELECT sql FROM 
(SELECT * FROM sqlite_master UNION ALL
SELECT * FROM sqlite_temp_master)
WHERE type!='meta'
ORDER BY tbl_name, type DESC, name

Or, if you give an argument to ".schema" because you only want the schema for a single table, the query looks like this:

SELECT sql FROM
(SELECT * FROM sqlite_master UNION ALL
SELECT * FROM sqlite_temp_master)
WHERE type!='meta' AND sql NOT NULL AND name NOT LIKE 'sqlite_%'
ORDER BY substr(type,2,1), name

You can supply an argument to the .schema command. If you do, the query looks like this:

SELECT sql FROM
(SELECT * FROM sqlite_master UNION ALL
SELECT * FROM sqlite_temp_master)
WHERE tbl_name LIKE '%s'
AND type!='meta' AND sql NOT NULL AND name NOT LIKE 'sqlite_%'
ORDER BY substr(type,2,1), name

The "%s" in the query is replace by your argument. This allows you to view the schema for some subset of the database.

sqlite> .schema %abc%

Along these same lines, the ".table" command also accepts a pattern as its first argument. If you give an argument to the .table command, a "%" is both appended and prepended and a LIKE clause is added to the query. This allows you to list only those tables that match a particular pattern.

The ".databases" command shows a list of all databases open in the current connection. There will always be at least 2. The first one is "main", the original database opened. The second is "temp", the database used for temporary tables. There may be additional databases listed for databases attached using the ATTACH statement. The first output column is the name the database is attached with, and the second column is the filename of the external file.

sqlite> .databases

Converting An Entire Database To An ASCII Text File

Use the ".dump" command to convert the entire contents of a database into a single ASCII text file. This file can be converted back into a database by piping it back into sqlite3.

A good way to make an archival copy of a database is this:

$ echo '.dump' | sqlite3 ex1 | gzip -c >ex1.dump.gz

This generates a file named ex1.dump.gz that contains everything you need to reconstruct the database at a later time, or on another machine. To reconstruct the database, just type:

$ zcat ex1.dump.gz | sqlite3 ex2

The text format is pure SQL so you can also use the .dump command to export an SQLite database into other popular SQL database engines. Like this:

$ createdb ex2
$ sqlite3 ex1 .dump | psql ex2

Other Dot Commands

The ".explain" dot command can be used to set the output mode to "column" and to set the column widths to values that are reasonable for looking at the output of an EXPLAIN command. The EXPLAIN command is an SQLite-specific SQL extension that is useful for debugging. If any regular SQL is prefaced by EXPLAIN, then the SQL command is parsed and analyzed but is not executed. Instead, the sequence of virtual machine instructions that would have been used to execute the SQL command are returned like a query result. For example:

sqlite> .explain
sqlite> explain delete from tbl1 where two<20;
addr  opcode        p1     p2     p3          
----  ------------  -----  -----  -------------------------------------  
0     ListOpen      0      0                  
1     Open          0      1      tbl1        
2     Next          0      9                  
3     Field         0      1                 
4     Integer       20     0                 
5     Ge            0      2                  
6     Key           0      0                 
7     ListWrite     0      0                 
8     Goto          0      2                  
9     Noop          0      0                  
10    ListRewind    0      0                  
11    ListRead      0      14                
12    Delete        0      0                  
13    Goto          0      11                
14    ListClose     0      0

The ".timeout" command sets the amount of time that the sqlite3 program will wait for locks to clear on files it is trying to access before returning an error. The default value of the timeout is zero so that an error is returned immediately if any needed database table or index is locked.

And finally, we mention the ".exit" command which causes the sqlite3 program to exit.

Using sqlite3 in a shell script

One way to use sqlite3 in a shell script is to use "echo" or "cat" to generate a sequence of commands in a file, then invoke sqlite3 while redirecting input from the generated command file. This works fine and is appropriate in many circumstances. But as an added convenience, sqlite3 allows a single SQL command to be entered on the command line as a second argument after the database name. When the sqlite3 program is launched with two arguments, the second argument is passed to the SQLite library for processing, the query results are printed on standard output in list mode, and the program exits. This mechanism is designed to make sqlite3 easy to use in conjunction with programs like "awk". For example:

$ sqlite3 ex1 'select * from tbl1' |
>  awk '{printf "<tr><td>%s<td>%s\n",$1,$2 }'
<tr><td>hello<td>10
<tr><td>goodbye<td>20
$

Ending shell commands

SQLite commands are normally terminated by a semicolon. In the shell you can also use the word "GO" (case-insensitive) or a slash character "/" on a line by itself to end a command. These are used by SQL Server and Oracle, respectively. These won't work in sqlite3_exec(), because the shell translates these into a semicolon before passing them to that function.

Compiling the sqlite3 program from sources

The sqlite3 program is built automatically when you compile the SQLite library. Just get a copy of the source tree, run "configure" and then "make".

footer $rcsid
Posted by 캠퍼스친구

1주 평균 13.7시간 사용…40~50대 증가율 계속 늘어

사용자 삽입 이미지

웹 2.0 바람속에서 전체 인터넷 이용자의 39.6%가 개인 블로그를 운영하는 블로거(Blogger)로 조사됐다. 연령별로는 20대의 블로그 운영비율이 68.2%로 가장 많았고, 40대와 50대 블로거 운영자도 각각 17.9%, 13.0%나 됐다.

또 40~50대 중년층의 인터넷 이용률이 지속적으로 증가하는 것으로 나타났다. 특히 보수성향이 높은 50대의 인터넷 이용률은 42.9% 였고, 전 연령대에서 가장 높은 7.2% 포인트의 이용 증가율을 보였다.

1일 정보통신부와 한국인터넷진흥원이 실시한 ‘2006년 하반기 정보화실태조사’ 결과에 따르면 2006년 12월 현재 만 6세 이상 국민의 인터넷 이용률은 74.8%, 이용자 수는 3412만명으로 지난해 같은 기간에 비해 111만명(2.0%p) 증가한 것으로 나타났다.

연령대별로는 30대 이하는 90% 이상이 인터넷을 이용했다. 6~19세까지는 전체의 98.5%가 인터넷 이용자로 나타나 가장 높은 비율을 기록했다. 40대(74.9%)와 50대(42.9%) 인터넷 이용률은 각각 6.2%p와 7.2%p의 큰 폭의 증가세를 보였다. 만 3~5세 유아의 인터넷 이용률은 51.4%(전3.5%p 증가)로 처음으로 절반을 넘어섰다.

인터넷 이용자는 1주 평균 13.7시간을 이용하며, 목적은 ‘정보획득(87.6%)’, ‘커뮤니케이션(83.8%)’, ‘여가활동(83.4%)’ 순으로 조사됐다.

인터넷쇼핑 이용률은 52.7%이며, 여성(57.7%)이 남성(48.5%)보다, 연령별로는 20대(76.6%)와 30대(62.0%)의 이용률이 상대적으로 높았다.

인터넷 이용자의 37.9%(은행거래자 중 44.8%)가 인터넷 뱅킹을 이용하고 있으며, 5.4%(주식거래자 중 74.0%)는 인터넷을 통해 주식거래를 하고 있는 것으로 조사됐다. 인터넷 이용자의 이메일 및 메신저 이용률은 각각 92.5%, 47.7%로 나타났다.

한편 이번 조사는 전국 1만 가구 및 가구내 만 3세 이상 가구원을 대상으로 방문조사로 이뤄졌으며, 신뢰구간은 95% 신뢰수준에서 ±0.58%이다.

박지환 기자(daebak@heraldm.com)

Posted by 캠퍼스친구
홈페이지 관련/ajax2007. 1. 31. 01:49

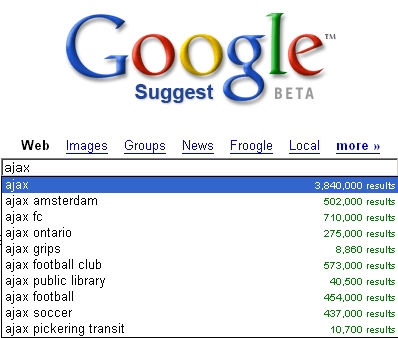
사용자 삽입 이미지

<Google Suggestion 의 ajax 를 활용한 자동완성 기능>

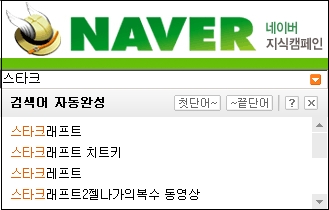
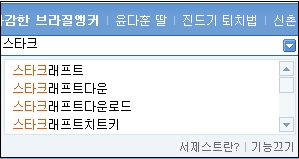
위 그림과 같은 자동완성 기능은 Google Suggest 에서 가장 먼저 구현하였다. 그 후 국내에는 네이버를 필두로 지금은 거의 모든 포탈업체의 검색창에는 마치 유행처럼 위와 같은 기능이 구현되어 있다.

사용자 삽입 이미지

<네이버의 자동완성 기능>


사용자 삽입 이미지
<다음의 자동완성 기능>
 
 
필자는 2005년 4월경 ajax 대신에 iframe 을 사용하여 자동완성 기능을 구현한 적이 있는데, 검색된 결과를 보여주는 창을 하나의 파일로 따로 만들어서 사용했었고 속도도 다소 느렸던 것으로 기억한다.
 
그럼 ajax 를 이용하여 단순한 자동완성 기능 예제를 살펴보자.
 
 
<!DOCTYPE HTML PUBLIC "-//W3C//DTD HTML 4.01 Transitional//EN">
<html>
  <head>
    <title>Ajax Auto Complete</title>
    <style type="text/css">
    .mouseOut {
    background: #708090;
    color: #FFFAFA;
    }
    .mouseOver {
    background: #FFFAFA;
    color: #000000;
    }
    </style>
    <script type="text/javascript">
        var xmlHttp;
        var completeDiv;
        var inputField;
        var nameTable;
        var nameTableBody;
        function createXMLHttpRequest() {
            if (window.ActiveXObject) {
                xmlHttp = new ActiveXObject("Microsoft.XMLHTTP");
            }
            else if (window.XMLHttpRequest) {
                xmlHttp = new XMLHttpRequest();    
            }
        }
        function initVars() {
            inputField = document.getElementById("names");
            nameTable = document.getElementById("name_table");
            completeDiv = document.getElementById("popup");
            nameTableBody = document.getElementById("name_table_body");
        }
        function findNames() {
            initVars();
            if (inputField.value.length > 0) {
                createXMLHttpRequest();
                var url = "AutoCompleteServlet?names=" + escape(inputField.value);
                xmlHttp.open("GET", url, true);
                xmlHttp.onreadystatechange = callback;
                xmlHttp.send(null);
            } else {
                clearNames();
            }
        }
        function callback() {
            if (xmlHttp.readyState == 4) {
                if (xmlHttp.status == 200) {
                    setNames(xmlHttp.responseXML.getElementsByTagName("name"));
                } else if (xmlHttp.status == 204){//데이터가 존재하지 않을 경우
                    clearNames();
                }
            }
        }
       
        function setNames(the_names) {
            clearNames();
            var size = the_names.length;
            setOffsets();
            var row, cell, txtNode;
            for (var i = 0; i < size; i++) {
                var nextNode = the_names[i].firstChild.data;
                row = document.createElement("tr");
                cell = document.createElement("td");
               
                cell.onmouseout = function() {this.className='mouseOver';};
                cell.onmouseover = function() {this.className='mouseOut';};
                cell.setAttribute("bgcolor", "#FFFAFA");
                cell.setAttribute("border", "0");
                cell.onclick = function() { populateName(this);};                    
                txtNode = document.createTextNode(nextNode);
                cell.appendChild(txtNode);
                row.appendChild(cell);
                nameTableBody.appendChild(row);
            }
        }
        function setOffsets() {
            var end = inputField.offsetWidth;
            var left = calculateOffsetLeft(inputField);
            var top = calculateOffsetTop(inputField) + inputField.offsetHeight;
            completeDiv.style.border = "black 1px solid";
            completeDiv.style.left = left + "px";
            completeDiv.style.top = top + "px";
            nameTable.style.width = end + "px";
        }
       
        function calculateOffsetLeft(field) {
          return calculateOffset(field, "offsetLeft");
        }
        function calculateOffsetTop(field) {
          return calculateOffset(field, "offsetTop");
        }
        function calculateOffset(field, attr) {
          var offset = 0;
          while(field) {
            offset += field[attr];
            field = field.offsetParent;
          }
          return offset;
        }
        function populateName(cell) {
            inputField.value = cell.firstChild.nodeValue;
            clearNames();
        }
        function clearNames() {
            var ind = nameTableBody.childNodes.length;
            for (var i = ind - 1; i >= 0 ; i--) {
                 nameTableBody.removeChild(nameTableBody.childNodes[i]);
            }
            completeDiv.style.border = "none";
        }
    </script>
  </head>
  <body>
    <h1>Ajax Auto Complete Example</h1>
    Names: <input type="text" size="20" id="names" onkeyup="findNames();" style="height:20;"/>
    <div style="position:absolute;" id="popup">
        <table id="name_table" bgcolor="#FFFAFA" border="0" cellspacing="0" cellpadding="0"/>           
            <tbody id="name_table_body"></tbody>
        </table>
    </div>
  </body>
</html>
<autoComplete.html 의 전체 소스 코드>
 
 
package ajaxbook.chap4;
import java.io.*;
import java.util.ArrayList;
import java.util.Iterator;
import java.util.List;
import javax.servlet.*;
import javax.servlet.http.*;
/**
 *
 * @author nate
 * @version
 */
public class AutoCompleteServlet extends HttpServlet {
    private List names = new ArrayList();
    public void init(ServletConfig config) throws ServletException {
        names.add("Abe");
        names.add("Abel");
        names.add("Abigail");
        names.add("Abner");
        names.add("Abraham");
        names.add("Marcus");
        names.add("Marcy");
        names.add("Marge");
        names.add("Marie");
    }
   
    /** Handles the HTTP <code>GET</code> method.
     * @param request servlet request
     * @param response servlet response
     */
    protected void doGet(HttpServletRequest request, HttpServletResponse response)
    throws ServletException, IOException {
        String prefix = request.getParameter("names");
        NameService service = NameService.getInstance(names);
        List matching = service.findNames(prefix);
        if (matching.size() > 0) {
            PrintWriter out = response.getWriter();
            response.setContentType("text/xml");
            response.setHeader("Cache-Control", "no-cache");
            out.println("<response>");
            Iterator iter = matching.iterator();
            while(iter.hasNext()) {
                String name = (String) iter.next();
                out.println("<name>" + name + "</name>");
            }
            out.println("</response>");
            matching = null;
            service = null;
            out.close();
        } else {
            response.setStatus(HttpServletResponse.SC_NO_CONTENT);
            //response.flushBuffer();
        }
    }
   
    /** Handles the HTTP <code>POST</code> method.
     * @param request servlet request
     * @param response servlet response
     */
    protected void doPost(HttpServletRequest request, HttpServletResponse response)
    throws ServletException, IOException {
        doGet(request, response);
    }
       
    /** Returns a short description of the servlet.
     */
    public String getServletInfo() {
        return "Short description";
    }
}
 
<AutoCompleteServlet.java 의 전체 소스 코드>


package ajaxbook.chap4;
import java.util.ArrayList;
import java.util.Iterator;
import java.util.List;
/**
 *
 * @author nate
 */
public class NameService {
    private List names;
   
    /** Creates a new instance of NameService */
    private NameService(List list_of_names) {
        this.names = list_of_names;
    }
   
    public static NameService getInstance(List list_of_names) {
        return new NameService(list_of_names);
    }
   
    public List findNames(String prefix) {
        String prefix_upper = prefix.toUpperCase();
        List matches = new ArrayList();
        Iterator iter = names.iterator();
        while(iter.hasNext()) {
            String name = (String) iter.next();
            String name_upper_case = name.toUpperCase();
            if(name_upper_case.startsWith(prefix_upper)){       
                boolean result = matches.add(name);
            }
        }
        return matches;
    }
   
}
<NameService.java 의 전체 소스 코드>

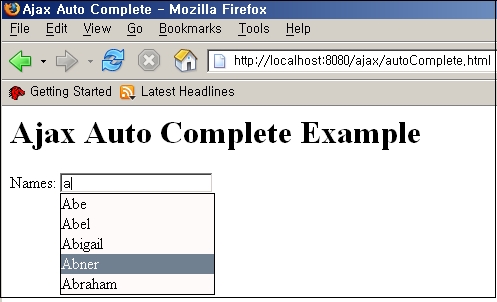
우선 실행결과 화면을 보고 설명을 이어가겠다.

사용자 삽입 이미지

위 그림의 검색어 입력창에 a 라는 문자를 입력하면 매칭되는 문자열의 리스트를 보여주는 그림이다.

입력창에 키워드를 입력하면 이벤트가 발생하고 XHR 객체가 문자를 GET/비동기 방식으로 서버로 보낸다. 서버에서는 요청한 검색어와 매칭되는 결과를 XML 로 만들어서 클라이언트로 보내고, XHR 객체가 응답 XML 을 파싱해서 결과를 화면에 보여주는 흐름이다.

        function callback() {
            if (xmlHttp.readyState == 4) {
                if (xmlHttp.status == 200) {
                    setNames(xmlHttp.responseXML.getElementsByTagName("name"));
                } else if (xmlHttp.status == 204){//데이터가 존재하지 않을 경우
                    clearNames();
                }
            }
        }

위 메소드에는 XHR 객체의 status 코드가 204 일 경우를 처리하고 있다. 즉, 검색 결과가 없을 경우에 결과창을 지우기 위한 것이다.

위 예제에서 눈여겨 봐야 할 부분은 XML 에서 데이터를 분석해서 동적으로 결과 화면을 만드는 부분일 것이다. DOM 객체의 속성 및 메소드를 많이 접해 봐야 한다.

       function setNames(the_names) {
            clearNames();
            var size = the_names.length;
            setOffsets();

            var row, cell, txtNode;
            for (var i = 0; i < size; i++) {
                var nextNode = the_names[i].firstChild.data;
                row = document.createElement("tr");
                cell = document.createElement("td");
               
                cell.onmouseout = function() {this.className='mouseOver';};
                cell.onmouseover = function() {this.className='mouseOut';};
                cell.setAttribute("bgcolor", "#FFFAFA");
                cell.setAttribute("border", "0");
                cell.onclick = function() { populateName(this);};                    

                txtNode = document.createTextNode(nextNode);
                cell.appendChild(txtNode);
                row.appendChild(cell);
                nameTableBody.appendChild(row);
            }
        }

위 메소드는 검색결과의 한 행을 만들어 테이블의 <tr></tr> 요소를 동적으로 생성해 주는 부분이다. cell.onmouseout 및 onclick 메소드 생성할때 setAttribute() 를 사용하지 않은 이유는 IE 가 지원하지 않기 때문이다. cross-browser, 즉 모든 브라우저에서 위 샘플 실행을 보장 받기 위해서는 코딩을 위처럼 해 줘야 한다.

이것으로 4장의 강의는 모두 마친다.


-------------------------- 한글 패치 추가(2006.02.23) ---------------------

위 예제는 한글 테스트가 불가능하기 때문에 이 기회에 Ajax 의 한글문제에 대해서 생각해 보자. GET 방식이든 POST 방식이든 파라미터가 서버로 전달될때는 해당 페이지에 설정된 charset 으로 인코딩 된다. 영문이나 숫자는 문제가 안되지만 한글과 같은 유니코드 문자는 적절한 charset 으로 디코딩해주지 않으면 ??? 혹은 이상한 문자로 출력될 것이다.

Ajax 의 경우 한글 인코딩 문제는 다음과 같이 두 부분으로 나누어서 생각해 볼 수 있다.

첫번째는 브라우저의 XHR 객체에서 한글 파라미터를 인코딩하고 서버에서 디코딩해서 처리하는 경우이다. 물론 같은 charset 으로 처리 해야 된다. 이부분은 개발자가 충분히 charset을 변경할 수 있으므로 유연하게 대처할 수 있다.

두번째는 서버에서 인코딩하고 브라우저의 XHR 객체에서 한글 데이터를 디코딩하는 경우이다. 서버에서 인코딩하는 경우는 개발자가 얼마든지 바꿀 수 있지만 브라우저에서 Ajax 가 데이터를 디코딩할 경우의 charset 은 UTF-8 로 정해져 있는것 같다. 다른 charset 으로 변경할 수 있는 방법이 존재하는지는 확실하지 않지만 여러방면으로 테스트해 본 결과 UTF-8로 지정되어 있는것 같다. 따라서 서버에서 인코딩하는 부분 뿐만아니라 첫번째의 경우도 모두 charset 을 UTF-8 으로 인코딩/디코딩하는 방법이 제일 간단할 것이다.

1. 브라우저에서 charset 을 UTF-8 으로 설정하기

먼저 autoComplete.html 의 소스에서는 charset 을 UTF-8 로 인코딩 해주는 부분만 수정해주면 될 것이다.

var url = "AutoCompleteServlet?names=" + escape(inputField.value);

위 코드에서 escape 메소드는 파라미터를 유니코드방식으로 인코딩하므로 이 메소드 대신에 UTF-8 방식으로 인코딩해주는 자바스크립트 메소드인 encodeURI 혹은 encodeURIComponent 으로 아래와 같이 수정해 준다.

var url = "AutoCompleteServlet?names=" + encodeURI(inputField.value);

위 예제는 GET 방식으로 작성되었으나 POST 방식의 경우도 같은 방법으로 charset 을 설정해주면 된다. 아래 코드는 POST 방식의 findNames 메소드이다.

function findNames() {
        initVars();
        if (inputField.value.length > 0) {
                createXMLHttpRequest();
                var url = "AutoCompleteServlet";
                xmlHttp.open("POST", url, true);
                xmlHttp.onreadystatechange = callback;
                xmlHttp.setRequestHeader("Content-Type", "application/x-www-form-urlencoded");
                xmlHttp.send("names=" + encodeURI(inputField.value));
                //encodeURI 대신에 encodeURIComponent 를 사용해도 결과는 동일하다.
        } else {
                clearNames();
        }
 }


2. 서버에서 charset 을 UTF-8 로 설정하기

다음은 AutoCompleteServlet 서브릿 소스에서 수정할 부분을 살펴보자.

protected void doGet(HttpServletRequest request, HttpServletResponse response)
    throws ServletException, IOException {
        String prefix = request.getParameter("names");

.
.
.


위의 doGet 메소드에 charset 을 UTF-8 으로 설정해주는 코드를 추가해준다. 그러면 브라우저에 UTF-8 방식으로 인코딩된 한글 파라미터는 같은 charset 으로 디코딩 될 것이다.

protected void doGet(HttpServletRequest request, HttpServletResponse response)
    throws ServletException, IOException {
        request.setCharacterEncoding("UTF-8");
        String prefix = request.getParameter("names");

.
.
.

다음은 서버에서 브라우저로 응답을 보내기 전에 charset 을 UTF-8 로 바꿔줘야 한다.

response.setContentType("text/xml");

위 소스 코드를 아래와 같이 수정해 준다.

response.setContentType("text/xml;charset=UTF-8");

마지막으로 DB 조회결과를 가상으로 꾸미기 위하여 한글 데이터를 추가해 준다.

public void init(ServletConfig config) throws ServletException {
        names.add("Abe");
        names.add("Abel");
        names.add("Abigail");
        names.add("Abner");
        names.add("Abraham");
        names.add("Marcus");
        names.add("Marcy");
        names.add("Marge");
        names.add("Marie");
        names.add("스타크");
        names.add("스타크래프트");
        names.add("스타크래프트 치트키");
        names.add("스타크래프트 다운로드");
    }

수정이 끝났으면 예제를 다시 실행해 보자.

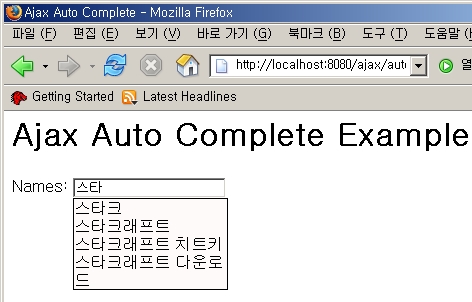
사용자 삽입 이미지

위 수정된 샘플은 다운받아 테스트해 볼 수 있다.
Posted by 캠퍼스친구
홈페이지 관련/ajax2007. 1. 31. 01:45

본인이 생각하는 웹서비스는 이기종간의 통신을 위한 몸부림? 이라고 생각한다.  웹서비스는 ajax 와 마찬가지로 현재 진행형이다. 이미 도입하여 이용하고 있는 곳도 있고 계속해서 버젼을 올리며 칼날을 세우고 있는 곳도 있다.

웹서비스는 어떤 언어로 구현됬는지에 상관없이 그 서비스를 사용할 수 있도록 구현해야 하는 기술로써, 이런 통신이 가능토록 하기 위한 가장 기본적인 초석은 HTTP 통신 프로토콜을 사용하고 있다는 것과 이기종간의 데이터 포맷을 고려하여 텍스트 기반의 XML 을 사용한다는 것이다.

Ajax 를 이용해서 SOAP 프로토콜을 기반으로 작성된 웹서비스에 접근할 수 있을까? 가능하지만 사실 어렵다. SOAP 프로토콜은 실제 XML 객체를 파라미터로 사용하고 있기 때문에 지금까지 우리가 해온 방식인 스트링 조합가지고는 상당히 힘들다. 왜냐하면 스트링을 조합하는 과정에서 에러가 날 수있는 확률이 매우 높기 때문에 좋은 방법은 아닐 것이다. 또한 SOAP 은 GET 방식이 아닌 POST 방식을 주로 사용해야 한다. 따라서 좀 더 쉬운 방법으로 SOAP request 을 위한 정적 XML 템플릿을 XMLHttpRequest  가 로드한 후에 DOM 속성과 메소드를 이용하여 XML 데이터를 조작하는 것이 훨씬 수월할 것이다.

 SOAP 을 이용하는 것 말고 좀 더 쉬운 방법이 존재한다. Representational State Transfer(REST) 은 웹서비스를 아주 쉽게 이용할 수 있는 서비스 이다. REST 는 SOAP 과 비교하자면 20%의 노력으로 SOAP 의 80% 에 해당하는 이득을 취할 수 있다고 한다. Ajax 는 REST 기반 웹서비스에 아주 적합하다. XHR 객체를 이용해서 REST 웹서비스에 비동기로 접근하고 그 결과는 XML 로 받아서 브라우저에서 파싱하여 사용하면 끝이다. 어떤가? 우리가 지금까지 해오던 방식과 아주 흡사하지 않은가?

여기서 한가지 더 짚고 가야 할 것은 XHR 객체의 보안 문제이다. 이 문제는 AJAX 강의 2장 - XMLHttpRequest 오브젝트 사용하기에서 언급하였다. XHR 객체가 웹서비스를 사용한다는 것은 자기가 속해 있는 도메인 밖에 있는 서버의 리소스 url 에 접근한다는 의미이므로 보안 문제는 반드시 발생하게 되어 있다. 따라서 이 문제를 해결하기 위해서는 게이트웨이 기능을 하는 프로그램을 추가로 개발해야 한다. 표현이 게이트웨이라 그럴듯해 보이지만 코딩은 굉장히 간단하다. 게이트웨이 기능은 네트웍 프로그램으로 서버쪽 프로그램에서 구현할 것이다.

이번장의 샘플 프로그램은 야후에 구현되어 있는 REST 웹서비스에 접근하여 그 결과를 보여주는 프로그램이다.

<!DOCTYPE html PUBLIC "-//W3C//DTD XHTML 1.0 Strict//EN"
  "http://www.w3.org/TR/xhtml1/DTD/xhtml1-strict.dtd">
<html xmlns="http://www.w3.org/1999/xhtml">
<head>
<title>Yahoo! Search Web Services</title>

<script type="text/javascript">
var xmlHttp;

function createXMLHttpRequest() {
    if (window.ActiveXObject) {
        xmlHttp = new ActiveXObject("Microsoft.XMLHTTP");
    }
    else if (window.XMLHttpRequest) {
        xmlHttp = new XMLHttpRequest();
    }
}
   
function doSearch() {
    var url = "YahooSearchGateway?" + createQueryString() + "&ts=" + new Date().getTime();
    createXMLHttpRequest();
    xmlHttp.onreadystatechange = handleStateChange;
    xmlHttp.open("GET", url, true);
    xmlHttp.send(null);
}

function createQueryString() {
    var searchString = document.getElementById("searchString").value;
    searchString = escape(searchString);
   
    var maxResultsCount = document.getElementById("maxResultCount").value;

    var queryString = "query=" + searchString + "&results=" + maxResultsCount;
    return queryString;
}
   
function handleStateChange() {
    if(xmlHttp.readyState == 4) {
        if(xmlHttp.status == 200) {
            parseSearchResults();
        }
        else {
            alert("Error accessing Yahoo! search");
        }
    }
}

function parseSearchResults() {
    var resultsDiv = document.getElementById("results");
    while(resultsDiv.childNodes.length > 0) {
        resultsDiv.removeChild(resultsDiv.childNodes[0]);
    }
   
    var allResults = xmlHttp.responseXML.getElementsByTagName("Result");
    var result = null;
    for(var i = 0; i < allResults.length; i++) {
        result = allResults[i];
        parseResult(result);
    }
}

function parseResult(result) {
    var resultDiv = document.createElement("div");
   
    var title = document.createElement("h3");
    title.appendChild(document.createTextNode(getChildElementText(result, "Title")));
    resultDiv.appendChild(title);
   
    var summary = document.createTextNode(getChildElementText(result, "Summary"));
    resultDiv.appendChild(summary);
   
    resultDiv.appendChild(document.createElement("br"));
    var clickHere = document.createElement("a");
    clickHere.setAttribute("href", getChildElementText(result, "ClickUrl"));
    clickHere.appendChild(document.createTextNode(getChildElementText(result, "Url")));
    resultDiv.appendChild(clickHere);
   
    document.getElementById("results").appendChild(resultDiv);
}

function getChildElementText(parentNode, childTagName) {
    var childTag = parentNode.getElementsByTagName(childTagName);
    return childTag[0].firstChild.nodeValue;
}
</script>
</head>

<body>
  <h1>Web Search Using Yahoo! Search Web Services</h1>
 
  <form action="#">
    Search String: <input type="text" id="searchString"/>
   
    <br/><br/>
    Max Number of Results:
    <select id="maxResultCount">
        <option value="1">1</option>
        <option value="10">10</option>
        <option value="25">25</option>
        <option value="50">50</option>
    </select>
   
    <br/><br/>
    <input type="button" value="Submit" onclick="doSearch();"/>
  </form>
 
  <h2>Results:</h2>
  <div id="results"/>

</body>
</html>

<yahooSearch.html 의 전체 소스 코드>


package ajaxbook.chap4;

import java.io.*;
import java.net.HttpURLConnection;
import java.net.URL;

import javax.servlet.*;
import javax.servlet.http.*;

public class YahooSearchGatewayServlet extends HttpServlet {
    private static final String YAHOO_SEARCH_URL =
        "http://api.search.yahoo.com/WebSearchService/V1/webSearch?appid=thunderboltsoftware"
        + "&type=all";

    protected void processRequest(HttpServletRequest request, HttpServletResponse response)
    throws ServletException, IOException {

        String url = YAHOO_SEARCH_URL + "&" + request.getQueryString();

        HttpURLConnection con = (HttpURLConnection)new URL(url).openConnection();
        con.setDoInput(true);
        con.setDoOutput(true);

        con.setRequestMethod("GET");

        //Send back the response to the browser
        response.setStatus(con.getResponseCode());
        response.setContentType("text/xml");

        BufferedReader reader = new BufferedReader(new InputStreamReader(con.getInputStream()));
        String input = null;
        OutputStream responseOutput = response.getOutputStream();

        while((input = reader.readLine()) != null) {
            responseOutput.write(input.getBytes());
        }

    }

    protected void doGet(HttpServletRequest request, HttpServletResponse response)
    throws ServletException, IOException {
        processRequest(request, response);
    }
}

<YahooSearchGatewayServlet.java 의 전체 소스 코드>


코드가 너무 단순한 것도 있지만 지금까지 해오던 방식 그대로이기때문에 자세한 설명은 생략하겠다. 서버쪽에 위치한 게이트웨이 프로그램은 자바를 이용해서 야후가 제공하는 REST 웹서비스 url 에 네트웍으로 접근하여 그 결과를 얻어오는 프로그램으로 굳이 자바를 사용하지 않더라도 다른 언어로 충분히 작성할 수 있을 것이다.

실핼 결과를 살펴보자.

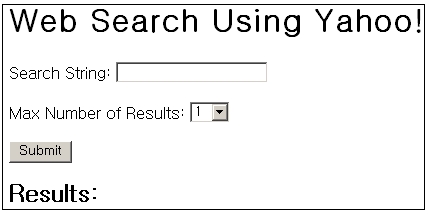
사용자 삽입 이미지

위 그림은 yahooSearch.html 의 실행화면이다. 검색할 단어를 입력하고 검색결과 갯수를 10으로 지정한 후 Submit 버튼을 눌러보자.

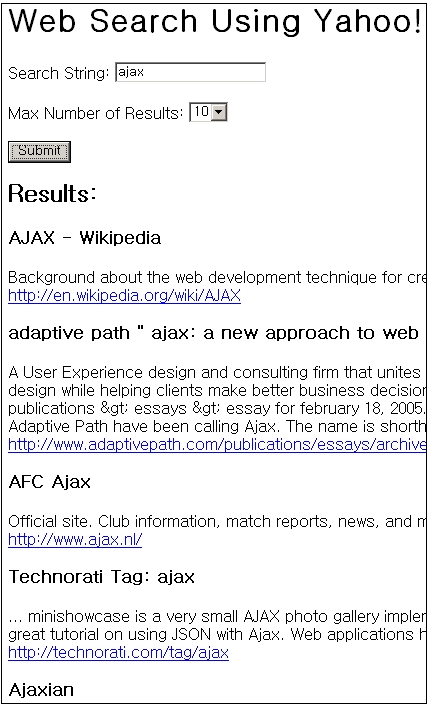
사용자 삽입 이미지

위 그림은 ajax 라는 검색어를 10개의 검색결과로 지정해서 얻은 결과이다. 실제 야후 웹싸이트에 가서 ajax 라는 키워드로 검색해 보자.

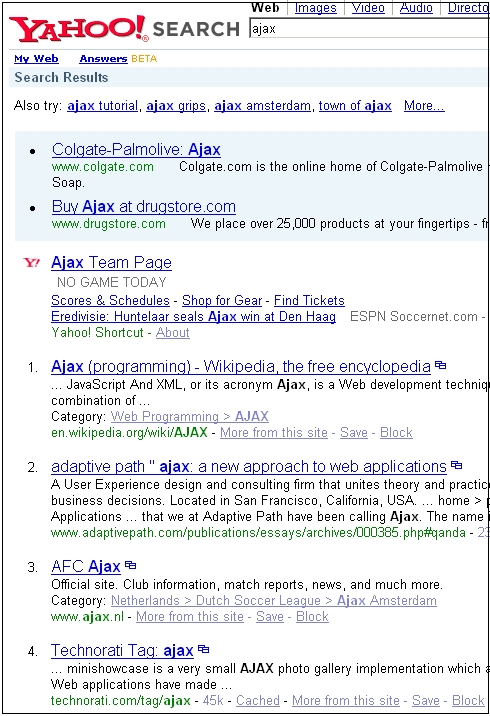
사용자 삽입 이미지
위 화면은 같은 ajax 키워드로 검색한 실제 결과이다. 샘플 예제와 순서가 조금 다를뿐 제목과 내용, 그리고 링크까지 같은 결과를 보여주고 있음을 확인 할 수 있다.
Posted by 캠퍼스친구
홈페이지 관련/ajax2007. 1. 31. 01:42

전통적인 웹 프로그램의 경우 추가 프로세스는 다음과 같이 진행된다.
1. 전체 리스트를 조회하는 화면에서 추가 버튼 클릭
2. 추가할 항목의 세부사항을 입력받을 화면
3. 입력을 마치면 저장 버튼
4. 입력이 정상적으로 끝났다는 화면 혹은 맨 처음 전체 리스트 화면.

이것처럼 추가 프로세스를 구현하기 위해서 항목을 입력받는 페이지를 추가로 구현해야 한다. 하지만 ajax 를 이용하여 한 페이지 내에서 모든 것을 다 구현할 수 있다. 추가 프로세스가 진행되고 난 후 필요한 부분만 refresh 되는 건 당연하다. ajax 를 이용해서 추가로직만 구현해본 예제를 살펴보자.

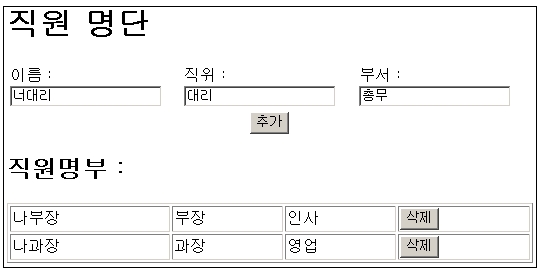
사용자 삽입 이미지

위와 같이 직원명단을 입력하는 화면에서 필요 항목을 입력한 후 추가 버튼을 클릭하면 아래와 같이 같은 화면에 그 결과를 동적으로 반영할 수 있다. 또한 삭제 버튼을 누르면 해당 정보가 동적으로 사라진다.

사용자 삽입 이미지

그럼 해당 소스코드를 살펴보자.

<!DOCTYPE html PUBLIC "-//W3C//DTD XHTML 1.0 Strict//EN"
  "http://www.w3.org/TR/xhtml1/DTD/xhtml1-strict.dtd">
<html xmlns="http://www.w3.org/1999/xhtml">
<head>
<title>Employee List</title>

<script type="text/javascript">
var xmlHttp;
var name;
var title;
var department;
var deleteID;
var EMP_PREFIX = "emp-";

function createXMLHttpRequest() {
    if (window.ActiveXObject) {
        xmlHttp = new ActiveXObject("Microsoft.XMLHTTP");
    }
    else if (window.XMLHttpRequest) {
        xmlHttp = new XMLHttpRequest();
    }
}
   
function addEmployee() {
    name = document.getElementById("name").value;
    title = document.getElementById("title").value;
    department = document.getElementById("dept").value;
    action = "add";

    if(name == "" || title == "" || department == "") {
        return;
    }
   
    var url = "EmployeeList?"
        + createAddQueryString(name, title, department, "add")
        + "&ts=" + new Date().getTime();
       
    createXMLHttpRequest();
    xmlHttp.onreadystatechange = handleAddStateChange;
    xmlHttp.open("GET", url, true);
    xmlHttp.send(null);
}

function createAddQueryString(name, title, department, action) {
    var queryString = "name=" + name
        + "&title=" + title
        + "&department=" + department
        + "&action=" + action;
    return queryString;
}
   
function handleAddStateChange() {
    if(xmlHttp.readyState == 4) {
        if(xmlHttp.status == 200) {
            updateEmployeeList();
            clearInputBoxes();
        }
        else {
            alert("Error while adding employee.");
        }
    }
}

function clearInputBoxes() {
    document.getElementById("name").value = "";
    document.getElementById("title").value = "";
    document.getElementById("dept").value = "";
}

function deleteEmployee(id) {
    deleteID = id;
   
    var url = "EmployeeList?"
        + "action=delete"
        + "&id=" + id
        + "&ts=" + new Date().getTime();
       
    createXMLHttpRequest();
    xmlHttp.onreadystatechange = handleDeleteStateChange;
    xmlHttp.open("GET", url, true);
    xmlHttp.send(null);
}

function updateEmployeeList() {
    var responseXML = xmlHttp.responseXML;

    var status = responseXML.getElementsByTagName("status").item(0).firstChild.nodeValue;
 //var status = responseXML.getElementsByTagName("status")[0].firstChild.data;
    status = parseInt(status);
    if(status != 1) {
        return;
    }

   
    var row = document.createElement("tr");
    var uniqueID = responseXML.getElementsByTagName("uniqueID")[0].firstChild.nodeValue;
    row.setAttribute("id", EMP_PREFIX + uniqueID);
   
    row.appendChild(createCellWithText(name));
    row.appendChild(createCellWithText(title));
    row.appendChild(createCellWithText(department));
   
    var deleteButton = document.createElement("input");
    deleteButton.setAttribute("type", "button");
    deleteButton.setAttribute("value", "삭제");
    deleteButton.onclick = function () { deleteEmployee(uniqueID); };
    var cell = document.createElement("td");
    cell.appendChild(deleteButton);
    row.appendChild(cell);
   
    document.getElementById("employeeList").appendChild(row);
    updateEmployeeListVisibility();
}

function createCellWithText(text) {
    var cell = document.createElement("td");
    cell.appendChild(document.createTextNode(text));
    return cell;
}

function handleDeleteStateChange() {
    if(xmlHttp.readyState == 4) {
        if(xmlHttp.status == 200) {
            deleteEmployeeFromList();
        }
        else {
            alert("Error while deleting employee.");
        }
    }

}

function deleteEmployeeFromList() {
    //var status = xmlHttp.responseXML.getElementsByTagName("status").item(0).firstChild.nodeValue;
 var status = xmlHttp.responseXML.getElementsByTagName("status")[0].firstChild.data;
    status = parseInt(status);
    if(status != 1) {
        return;
    }
   
    var rowToDelete = document.getElementById(EMP_PREFIX + deleteID);
    var employeeList = document.getElementById("employeeList");
    employeeList.removeChild(rowToDelete);
   
    updateEmployeeListVisibility();
}

function updateEmployeeListVisibility() {
    var employeeList = document.getElementById("employeeList");
    if(employeeList.childNodes.length > 0) {
        document.getElementById("employeeListSpan").style.display = "";
    }
    else {
        document.getElementById("employeeListSpan").style.display = "none";
    }
}
</script>
</head>

<body>
  <h1>직원 명단</h1>
 
  <form action="#">
    <table width="80%" border="0">
        <tr>
            <td>이름 : <input type="text" id="name"/></td>
            <td>직위 : <input type="text" id="title"/></td>
            <td>부서 : <input type="text" id="dept"/></td>
        </tr>
        <tr>
            <td colspan="3" align="center">
                <input type="button" value="추가" onclick="addEmployee();"/>
            </td>
        </tr>
    </table>
  </form>

  <span id="employeeListSpan" style="display:none;">
  <h2>직원명부 : </h2>
 
  <table border="1" width="80%">
    <tbody id="employeeList"></tbody>
  </table>
  </span>
</body>
</html>

<employeeList.html 의 모든 소스 코드>


package ajaxbook.chap4;

import java.io.*;
import java.net.*;
import java.util.Random;

import javax.servlet.*;
import javax.servlet.http.*;

public class EmployeeListServlet extends HttpServlet {
   
    protected void addEmployee(HttpServletRequest request, HttpServletResponse response)
    throws ServletException, IOException {
       
        //Store the object in the database
        String uniqueID = storeEmployee();
       
        //Create the response XML
        StringBuffer xml = new StringBuffer("<result><uniqueID>");
        xml.append(uniqueID);
        xml.append("</uniqueID>");
        xml.append("<status>1</status>");
        xml.append("</result>");
       
        //Send the response back to the browser
        sendResponse(response, xml.toString());
    }
   
    protected void deleteEmployee(HttpServletRequest request, HttpServletResponse response)
    throws ServletException, IOException {
       
        String id = request.getParameter("id");
        /* Assume that a call is made to delete the employee from the database */
       
        //Create the response XML
        StringBuffer xml = new StringBuffer("<result>");
        xml.append("<status>1</status>");
        xml.append("</result>");
       
        //Send the response back to the browser
        sendResponse(response, xml.toString());
    }
   
    protected void doGet(HttpServletRequest request, HttpServletResponse response)
    throws ServletException, IOException {
        String action = request.getParameter("action");
        if(action.equals("add")) {
            addEmployee(request, response);
        }
        else if(action.equals("delete")) {
            deleteEmployee(request, response);
        }
    }
   
    private String storeEmployee() {
        /* Assume that the employee is saved to a database and the
         * database creates a unique ID. Return the unique ID to the
         * calling method. In this case, make up a unique ID.
         */
        String uniqueID = "";
        Random randomizer = new Random(System.currentTimeMillis());
        for(int i = 0; i < 8; i++) {
            uniqueID += randomizer.nextInt(9);
        }
       
        return uniqueID;
    }
   
    private void sendResponse(HttpServletResponse response, String responseText)
    throws IOException {
        response.setContentType("text/xml");
        response.getWriter().write(responseText);
    }
}

<EmployeeListServlet.java 의 모든 소스 코드>

위 예제에 대한 소스를 보면 쉽게 알겠지만 직원의 정보를 입력하고 추가 버튼을 누르면 파라미터 쿼리 스트링을 생성해서 GET/비동기 방식으로 서버로 보낸다. 서버에서는 해당 정보를 DB 에 insert 가상 로직을 수행하고 그 결과를 XML 로 만들어서 클라이언트로 전송한다. XHR 객체는 해당 XML 정보로 부터 정보를 다시 추출하고 테이블에 추가하는 형태의 흐름으로 전개된다. 삭제 로직도 추가 로직과 거의 비슷하게 동작한다.

위 예제중에 한가지 살펴볼 것이 있다.

deleteButton.onclick = function () { deleteEmployee(uniqueID); };

이 부분의 코드를 다음과 같이 사용할 수도 있을 것이다.

deleteButton.setAttibute("onclick", "deleteEmployee('"+uniqueID+"');");

하지만 IE 및 FireFox 두개의 브라우저에서 제대로 작동을 하지 않았다. 하지만 다행히 처음코드를 사용하면 모두 정상적으로 잘 작동 하였다. AJAX 를 사용하면서 가장 큰 골치거리가 바로 이런 코드이다. 하루빨리 W3C 표준을 구현하도록 브라우저 전영에도 각성이 촉구된다.

Posted by 캠퍼스친구
홈페이지 관련/ajax2007. 1. 31. 01:39

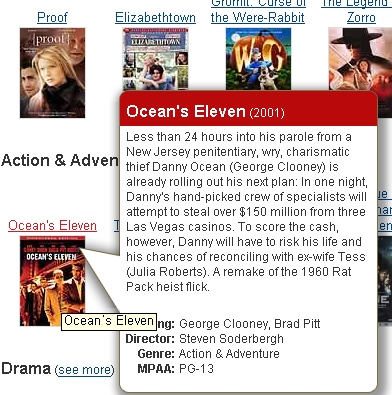
웹 페이지에서 툴팁이란 어떤 것일까?

아래 그림을 보자. 마우스를 해당 이미지에 갖다 대면 그 그림에 대한 세부 설명이 나오는 것을 봤을 것이다. 이런 기능을 ajax 을 이용해서 구현할 수 있다.


사용자 삽입 이미지
 
 
보잘 것 없지만 기능을 단순화 시킨 예제를 살펴보자.
 
 
<!DOCTYPE HTML PUBLIC "-//W3C//DTD HTML 4.01 Transitional//EN">
<html>
  <head>
    <title>Ajax Tooltip</title>
    <script type="text/javascript">       
        var xmlHttp;
        var dataDiv;
        var dataTable;
        var dataTableBody;
        var offsetEl;
        function createXMLHttpRequest() {
            if (window.ActiveXObject) {
                xmlHttp = new ActiveXObject("Microsoft.XMLHTTP");
            }
            else if (window.XMLHttpRequest) {
                xmlHttp = new XMLHttpRequest();               
            }
        }
        function initVars() {
            dataTableBody = document.getElementById("courseDataBody");           
            dataTable = document.getElementById("courseData");
            dataDiv = document.getElementById("popup");
        }
        function getCourseData(element) {
            initVars();           
            createXMLHttpRequest();
            offsetEl = element;
            var url = "ToolTipServlet?key=" + escape(element.id);
           
            xmlHttp.open("GET", url, true);
            xmlHttp.onreadystatechange = callback;
            xmlHttp.send(null);
        }
        function callback() {
            if (xmlHttp.readyState == 4) {
                if (xmlHttp.status == 200) {
                    setData(xmlHttp.responseXML);
                }
            }
        }
       
        function setData(courseData) {           
            clearData();
            setOffsets();
            var length = courseData.getElementsByTagName("length")[0].firstChild.data;
            var par = courseData.getElementsByTagName("par")[0].firstChild.data;
           
            var row, row2;
            var parData = "Par: " + par
            var lengthData = "Length: " + length;
           
            row = createRow(parData);           
            row2 = createRow(lengthData);
           
            dataTableBody.appendChild(row);
            dataTableBody.appendChild(row2);
        }
        function createRow(data) {           
            var row, cell, txtNode;
            row = document.createElement("tr");
            cell = document.createElement("td");
            cell.setAttribute("bgcolor", "#FFFAFA");
            cell.setAttribute("border", "0");                          
            txtNode = document.createTextNode(data);
            cell.appendChild(txtNode);
            row.appendChild(cell);
          
            return row; 
        }
       
        function setOffsets() {
            var end = offsetEl.offsetWidth;
            var top = calculateOffsetTop(offsetEl);
            dataDiv.style.border = "black 1px solid";
            dataDiv.style.left = end + 15 + "px";
            dataDiv.style.top = top + "px";
        }
       
        function calculateOffsetTop(field) {
          return calculateOffset(field, "offsetTop");
        }
        function calculateOffset(field, attr) {
          var offset = 0;
          while(field) {
            offset += field[attr];
            field = field.offsetParent;
          }
          return offset;
        }
        function clearData() {           
            var ind = dataTableBody.childNodes.length;           
            for (var i = ind - 1; i >= 0 ; i--) {
                dataTableBody.removeChild(dataTableBody.childNodes[i]);      
            }
            dataDiv.style.border = "none";
        }       
    </script>
  </head>
  <body>
    <h1>Ajax Tooltip Example</h1>
    <h3>Golf Courses</h3>
    <table id="courses" bgcolor="#FFFAFA" border="1" cellspacing="0" cellpadding="2"/>
        <tbody>
            <tr><td id="1" onmouseover="getCourseData(this);" onmouseout="clearData();">Augusta National</td></tr>
            <tr><td id="2" onmouseover="getCourseData(this);" onmouseout="clearData();">Pinehurst No. 2</td></tr>
            <tr><td id="3" onmouseover="getCourseData(this);" onmouseout="clearData();">St. Andrews Links</td></tr>
            <tr><td id="4" onmouseover="getCourseData(this);" onmouseout="clearData();">Baltusrol Golf Club</td></tr>
        </tbody>       
    </table>
    <div style="position:absolute;" id="popup">
        <table id="courseData" bgcolor="#FFFAFA" border="0" cellspacing="2" cellpadding="2"/>
            <tbody id="courseDataBody"></tbody>
        </table>
    </div>
  </body>
</html>
<toolTip.html 의 전체 소스>
 
 
package ajaxbook.chap4;
import java.io.*;
import java.util.HashMap;
import java.util.Map;
import javax.servlet.*;
import javax.servlet.http.*;
/**
 *
 * @author nate
 * @version
 */
public class ToolTipServlet extends HttpServlet {
   
    private Map courses = new HashMap();
    public void init(ServletConfig config) throws ServletException {
        CourseData augusta = new CourseData(72, 7290);
        CourseData pinehurst = new CourseData(70, 7214);
        CourseData standrews = new CourseData(72, 6566);
        CourseData baltusrol = new CourseData(70, 7392);
        courses.put(new Integer(1), augusta);
        courses.put(new Integer(2), pinehurst);
        courses.put(new Integer(3), standrews);
        courses.put(new Integer(4), baltusrol);
    }
   
    /** Handles the HTTP <code>GET</code> method.
     * @param request servlet request
     * @param response servlet response
     */
    protected void doGet(HttpServletRequest request, HttpServletResponse response)
    throws ServletException, IOException {
        Integer key = Integer.valueOf(request.getParameter("key"));
        CourseData data = (CourseData) courses.get(key);
       
        PrintWriter out = response.getWriter();
        response.setContentType("text/xml");
        response.setHeader("Cache-Control", "no-cache");
        out.println("<response>");
        out.println("<par>" + data.getPar() + "</par>");
        out.println("<length>" + data.getLength() + "</length>");
        out.println("</response>");
        out.close();
    }
   
    /** Handles the HTTP <code>POST</code> method.
     * @param request servlet request
     * @param response servlet response
     */
    protected void doPost(HttpServletRequest request, HttpServletResponse response)
    throws ServletException, IOException {
        doGet(request, response);
    }
       
    /** Returns a short description of the servlet.
     */
    public String getServletInfo() {
        return "Short description";
    }
   
    private class CourseData {
        private int par;
        private int length;
       
        public CourseData(int par, int length) {
            this.par = par;
            this.length = length;
        }
       
        public int getPar() {
            return this.par;
        }
       
        public int getLength() {
            return this.length;
        }
    }
}
 
<ToolTipServlet.java 의 전체 소스 코드>


이전 예제와 다른 점은 옵셋을 구현한 코드이다.
 
function calculateOffset(field, attr) {
    var offset = 0;
    while(field) {
        offset += field[attr];
        field = field.offsetParent;
    }
    return offset;
}
 
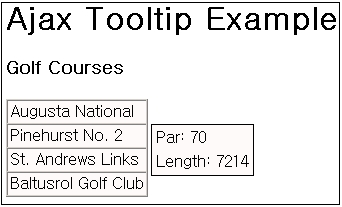
이 코드는 브라우저 마다 작동을 안할 수 있지만, 테스트 해본 결과 IE 와 firefox 에서는 잘 실행되었다. 위 예제를 실행해 본 결과는 아래와 같다.

 
사용자 삽입 이미지
 
Posted by 캠퍼스친구
홈페이지 관련/ajax2007. 1. 31. 01:37

웹 프로그램의 경우 요청에 대한 응답이 제대로 오지 않거나 너무 많은 시간이 걸린다면 사용자는 불평을 하면서 다른 싸이트로 가버리고 다시는 그 싸이트를 이용하지 않을 것이다. 혹은 금전적인 문제가 걸려있다면 서비스 콜센터로 항의 전화를 할 것이다.

2년전 국내 모 은행 인터넷 뱅킹을 개발하면서 로그인 기능을 구현해 놓을 것을 살펴보고 놀라지 않을 수 없었다. 로그인을 하는데 자그마치 30초가 걸렸다. 웹 프로그램에서 30초라...어떻게 생각하는가? 당연히 설계가 잘못됬다. 고객에게 이런 불편을 초래하는 싸이트라면 경쟁 인터넷뱅킹 은행에게 모든 고객을 빼앗길 것이다.

 몇년전의 통계수치라 지금은 기억이 잘 나지 않지만, 인터넷 이용자가 응답정보를 기다리다 인내심을 더이상 참지 못하고 다른 싸이트로 가버리는 시간은 7~8초 였던 것으로 기억한다. 하지만 지금은 좀더 짧아지지 않았을까 생각한다.

30초는 정말 말도 안되는 시간이지만 5~6초정도의 시간이면 사용자에게 현재 서버의 작업 진행상태를 표시해주면 사용자는 안도감을 느끼면서 좀 더 기다려줄 확률은 높아질 수 있다. 이것은 일종의 서비스 차원의 아이디어일뿐이지, 사실 서버의 프로그램을 수정해서 최대한 프로세스를 단축하는 것이 가장 좋은 해결책이라 하겠다.

로그인 하는데 30초 걸렸던 그 프로젝트에서는 할 수 없이 서버의 상태바를 이미지로 붙여 놓았다. 이런 이미지는 사실 의미가 없는것이 현재 서버의 상태를 실시간으로 보여주는 것이 아니라 반복적인 이미지로 하여금 고객을 짜증나게 할 수도 있다. 실제 서버의 작업 진척도와 현재 브라우저에서 보여주는 정보가 일치해야 진정한 상태바 프로그램이라 할 수 있겠다.

상태바 프로그램을 위해서는 자원의 소모라는 손해를 감수해야만 한다. 서버의 비지니스 로직이 현재 얼마나 진행됬는지 별도로 체크해야 하는 코딩이 추가되어야 한다. 가뜩이나 시간이 오래걸리는 작업인데 그 작업이 얼마나 진행됬는지 확인하는 로직이 추가된다면 자원의 소모가 그만큼 더 많아지게 되고 시간도 더 지연되는 것이다. 장점이 있다면 단점이 있기 마련이다. 장점을 더욱 부각시키고 단점을 줄이는 방향으로 생각을 전환하자.

이런 복잡한 문제에서 벗어나 지금은 상태바에 대한 구현 자체가 목적이므로 단순한 예제를 통해서 살펴보기로 하자.

<!DOCTYPE HTML PUBLIC "-//W3C//DTD HTML 4.01 Transitional//EN">

<html>
  <head>
    <title>Ajax Progress Bar</title>
    <script type="text/javascript">
        var xmlHttp;
        var key;
        var bar_color = 'gray';
        var span_id = "block";
        var clear = "&nbsp;&nbsp;&nbsp;"

        function createXMLHttpRequest() {
            if (window.ActiveXObject) {
                xmlHttp = new ActiveXObject("Microsoft.XMLHTTP");
            }
            else if (window.XMLHttpRequest) {
                xmlHttp = new XMLHttpRequest();               
            }
        }

        function go() {
            createXMLHttpRequest();
            checkDiv();
            var url = "ProgressBarServlet?task=create";
            var button = document.getElementById("go");
            button.disabled = true;
            xmlHttp.open("GET", url, true);
            xmlHttp.onreadystatechange = goCallback;
            xmlHttp.send(null);
        }

        function goCallback() {
            if (xmlHttp.readyState == 4) {
                if (xmlHttp.status == 200) {
                    setTimeout("pollServer()", 1000);
                }
            }
        }
       
        function pollServer() {
            createXMLHttpRequest();
            var url = "ProgressBarServlet?task=poll";
            xmlHttp.open("GET", url, true);
            xmlHttp.onreadystatechange = pollCallback;
            xmlHttp.send(null);
        }
       
        function pollCallback() {
            if (xmlHttp.readyState == 4) {
                if (xmlHttp.status == 200) {
                    var percent_complete = xmlHttp.responseXML.getElementsByTagName("percent")[0].firstChild.data;
                   
                    var index = processResult(percent_complete);
                    for (var i = 1; i <= index; i++) {
                        var elem = document.getElementById("block" + i);
                        elem.innerHTML = clear;

                        elem.style.backgroundColor = bar_color;
                        var next_cell = i + 1;
                        if (next_cell > index && next_cell <= 9) {
                            document.getElementById("block" + next_cell).innerHTML = percent_complete + "%";
                        }
                    }
                    if (index < 9) {
                        setTimeout("pollServer()", 1000);
                    } else {
                        document.getElementById("complete").innerHTML = "Complete!";
                        document.getElementById("go").disabled = false;
                    }
                }
            }
        }
       
        function processResult(percent_complete) {
            var ind;
            if (percent_complete.length == 1) {
                ind = 1;
            } else if (percent_complete.length == 2) {
                ind = percent_complete.substring(0, 1);
            } else {
                ind = 9;
            }
            return ind;
        }

        function checkDiv() {
            var progress_bar = document.getElementById("progressBar");
            if (progress_bar.style.visibility == "visible") {
                clearBar();
                document.getElementById("complete").innerHTML = "";
            } else {
                progress_bar.style.visibility = "visible"
            }
        }
       
        function clearBar() {
            for (var i = 1; i < 10; i++) {
                var elem = document.getElementById("block" + i);
                elem.innerHTML = clear;
                elem.style.backgroundColor = "white";
            }
        }
    </script>
  </head>
  <body>
    <h1>Ajax Progress Bar Example</h1>
    Launch long-running process: <input type="button" value="Launch" id="go" onclick="go();"/>
    <p>
    <table align="center">
        <tbody>
            <tr><td>
                <div id="progressBar" style="padding:2px;border:solid black 2px;visibility:hidden">
                    <span id="block1">&nbsp;&nbsp;&nbsp;</span>
                    <span id="block2">&nbsp;&nbsp;&nbsp;</span>
                    <span id="block3">&nbsp;&nbsp;&nbsp;</span>
                    <span id="block4">&nbsp;&nbsp;&nbsp;</span>
                    <span id="block5">&nbsp;&nbsp;&nbsp;</span>
                    <span id="block6">&nbsp;&nbsp;&nbsp;</span>
                    <span id="block7">&nbsp;&nbsp;&nbsp;</span>
                    <span id="block8">&nbsp;&nbsp;&nbsp;</span>
                    <span id="block9">&nbsp;&nbsp;&nbsp;</span>
                </div>
            </td></tr>
            <tr><td align="center" id="complete"></td></tr>
        </tbody>
    </table>
  </body>
</html>

<progressBar.html 의 전체 소스 코드>


package ajaxbook.chap4;

import java.io.*;

import javax.servlet.*;
import javax.servlet.http.*;

/**
 *
 * @author nate
 * @version
 */
public class ProgressBarServlet extends HttpServlet {
    private int counter = 1;
   
    /** Handles the HTTP <code>GET</code> method.
     * @param request servlet request
     * @param response servlet response
     */
    protected void doGet(HttpServletRequest request, HttpServletResponse response)
    throws ServletException, IOException {
        String task = request.getParameter("task");
        String res = "";
       
        if (task.equals("create")) {
            res = "<key>1</key>";
            counter = 1;
        }
        else {
            String percent = "";
            switch (counter) {
                case 1: percent = "10"; break;
                case 2: percent = "23"; break;
                case 3: percent = "35"; break;
                case 4: percent = "51"; break;
                case 5: percent = "64"; break;
                case 6: percent = "73"; break;
                case 7: percent = "89"; break;
                case 8: percent = "100"; break;
            }
            counter++;
               
            res = "<percent>" + percent + "</percent>";
        }
       
        PrintWriter out = response.getWriter();
        response.setContentType("text/xml");
        response.setHeader("Cache-Control", "no-cache");
        out.println("<response>");
        out.println(res);
        out.println("</response>");
        out.close();
    }
   
    /** Handles the HTTP <code>POST</code> method.
     * @param request servlet request
     * @param response servlet response
     */
    protected void doPost(HttpServletRequest request, HttpServletResponse response)
    throws ServletException, IOException {
        doGet(request, response);
    }
   
    /** Returns a short description of the servlet.
     */
    public String getServletInfo() {
        return "Short description";
    }
}

<ProgressBarServlet.java 의 전체 소스 코드>

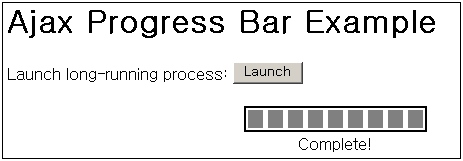
우선 실행 결과 화면을 먼저 살펴보자.


사용자 삽입 이미지

위 그리에서 Launch 버튼을 클릭하면 아래와 같은 상태바 결과를 확인 할 수 있다.


사용자 삽입 이미지
사용자 삽입 이미지

이런 상태바 프로그램을 작성하는데에는 ajax 가 정말 적합하다고 생각한다. 물론 자바스크립트 코드가 많아져서 이해하는데 어려움이 있을 수도 있지만 ajax 을 사용하지 않고 다른 방식으로 구현한다고 했을때 가능은 하겠지만 이때에도 역시 스크립팅 코드가 없을 수 만은 없다.

소스 코드는 이전예제와 별로 크게 다르지 않으므로 설명은 생략한다.

Posted by 캠퍼스친구
홈페이지 관련/ajax2007. 1. 26. 23:45

auto refresh 기능, 즉 자동으로 페이지의 일정부분을 지정한 시간마다 정보를 업데이트 해주는 기능이다.

우선 이런 기능을 이미 구현해 놓은 싸이트들을 살펴보자.

사용자 삽입 이미지

<최근 소식을 ajax 를 이용하여 소팅 기능을 구현한 싸이트(www.digg.com/spy)>


사용자 삽입 이미지

<다운로드 카운트를 ajax 를 이용하여 구현한 싸이트(www.apple.com/itunes)>


위 두 싸이트를 살펴보면 일정시간을 설정하여 지속적으로 해당 부분만 정보가 수정되는 것을 확인 할 수 있다. 이번 주제 역시 ajax 의 전형적인 특징으로 전체 페이지가 새로고침되지 않고 필요한 일정부분만 정보가 수정된다는데 있다.


단순한 예제를 통해서 auto refresh 기능에 대해서 생각해 보자


<!DOCTYPE HTML PUBLIC "-//W3C//DTD HTML 4.01 Transitional//EN">

<html>
  <head>
    <title>Ajax Dynamic Update</title>
    <script type="text/javascript">
        var xmlHttp;

        function createXMLHttpRequest() {
            if (window.ActiveXObject) {
                xmlHttp = new ActiveXObject("Microsoft.XMLHTTP");
            }
            else if (window.XMLHttpRequest) {
                xmlHttp = new XMLHttpRequest();               
            }
        }
       
        function doStart() {
            createXMLHttpRequest();
            var url = "DynamicUpdateServlet?task=reset";
            xmlHttp.open("GET", url, true);
            xmlHttp.onreadystatechange = startCallback;
            xmlHttp.send(null);
        }

        function startCallback() {
            if (xmlHttp.readyState == 4) {
                if (xmlHttp.status == 200) {                   
                    setTimeout("pollServer()", 5000);
                    refreshTime();
                }
            }
        }
       
        function pollServer() {
            createXMLHttpRequest();
            var url = "DynamicUpdateServlet?task=foo";
            xmlHttp.open("GET", url, true);
            xmlHttp.onreadystatechange = pollCallback;
            xmlHttp.send(null);
        }
       
        function refreshTime(){
            var time_span = document.getElementById("time");
            var time_val = time_span.innerHTML;

            var int_val = parseInt(time_val);
            var new_int_val = int_val - 1;
           
            if (new_int_val > -1) {
                setTimeout("refreshTime()", 1000);
                time_span.innerHTML = new_int_val;               
            } else {
                time_span.innerHTML = 5;
            }
        }
       
        function pollCallback() {
            if (xmlHttp.readyState == 4) {
                if (xmlHttp.status == 200) {               
                    var message = xmlHttp.responseXML.getElementsByTagName("message")[0].firstChild.data;                   
                   
                    if (message != "done") {
                        var new_row = createRow(message);
                        var table = document.getElementById("dynamicUpdateArea");
                        var table_body = table.getElementsByTagName("tbody").item(0);
                        var first_row = table_body.getElementsByTagName("tr").item(1);
                        table_body.insertBefore(new_row, first_row);                       
                        setTimeout("pollServer()", 5000);
                        refreshTime();
                    }
                }
            }
        }
       
        function createRow(message) {
            var row = document.createElement("tr");
            var cell = document.createElement("td");
            var cell_data = document.createTextNode(message);
            cell.appendChild(cell_data);
            row.appendChild(cell);
            return row;
        }
    </script>
  </head>
  <body>
    <h1>Ajax Dynamic Update Example</h1>
    This page will automatically update itself:
        <input type="button" value="Launch" id="go" onclick="doStart();"/>
    <p>
    Page will refresh in <span id="time">5</span> seconds.
    <p>
    <table id="dynamicUpdateArea" align="left">
        <tbody>
            <tr id="row0"><td></td></tr>
        </tbody>
    </table>
  </body>
</html>

<dynamicUpdate.html 의 전체 소스 코드>


package ajaxbook.chap4;

import java.io.*;
import java.net.*;

import javax.servlet.*;
import javax.servlet.http.*;

/**
 *
 * @author nate
 * @version
 */
public class DynamicUpdateServlet extends HttpServlet {
    private int counter = 1;
   
    /** Handles the HTTP <code>GET</code> method.
     * @param request servlet request
     * @param response servlet response
     */
    protected void doGet(HttpServletRequest request, HttpServletResponse response)
    throws ServletException, IOException {
        String res = "";
        String task = request.getParameter("task");
        String message = "";       
       
        if (task.equals("reset")) {
            counter = 1;
        } else {
            switch (counter) {
                case 1: message = "Steve walks on stage"; break;
                case 2: message = "iPods rock"; break;
                case 3: message = "Steve says Macs rule"; break;
                case 4: message = "Change is coming"; break;
                case 5: message = "Yes, OS X runs on Intel - has for years"; break;
                case 6: message = "Macs will soon have Intel chips"; break;
                case 7: message = "done"; break;
            }
            counter++;
        }

        res = "<message>" + message + "</message>";
       
        PrintWriter out = response.getWriter();
        response.setContentType("text/xml");
        response.setHeader("Cache-Control", "no-cache");
        out.println("<response>");
        out.println(res);
        out.println("</response>");
        out.close();
    }
   
    /** Handles the HTTP <code>POST</code> method.
     * @param request servlet request
     * @param response servlet response
     */
    protected void doPost(HttpServletRequest request, HttpServletResponse response)
    throws ServletException, IOException {
        doGet(request, response);
    }
   

    /** Returns a short description of the servlet.
     */
    public String getServletInfo() {
        return "Short description";
    }
}

<DynamicUpdateServlet 의 전체 소스 코드>


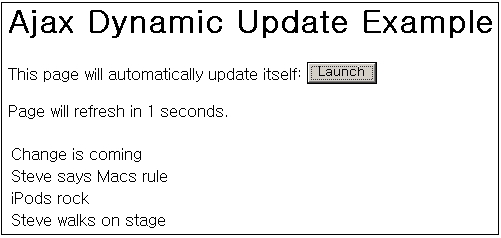
이번 예제는 실행결과 화면을 먼저 보고 설명하는 것이 좋을 듯 싶다.


사용자 삽입 이미지

위 그림은 dynamicUpdate.html 화면인데 Launch 버튼을 클릭하면 아래 화면의 일정부분이 refresh 될 것이다.


사용자 삽입 이미지

사실 seconds 가 5, 4, 3, 2, 1 으로 값이 줄어드는 것은 소스를 보면 알겠지만 자바스크립트로 처리한 것이고 중요하게 볼것은 그 아래에 있는 문자열이다. 5초가 지날때마다 브라우저는 서버에 비동기적으로 접속해 관련 데이터를 추출하여 추가해주는 부분이다.


소스는 그리 길지는 않지만 dynamicUpdate.html 소스는 스크립팅 처리가 좀 들어가 있다. 하지만 지금까지의 강의 내용을 잘 읽어 봤다면 처음나오는 코드나 이해가지 않는 곳은 없으리라 생각한다.

Posted by 캠퍼스친구
홈페이지 관련/ajax2007. 1. 26. 23:39

전통적으로 웹 프로그램밍은 사용자 입력에 의존한 step by step 어플리케이션에 매우 적합한 방식이다. 그 만큼 이전 페이지와 이후 페이지 사이에서의 사용자 입력이 중요하다. 어떻게 보면 이런 step by step 방식의 페이지 구성은 웹이 아닌 다른 프로그램과 비교해봤을때 어떻게 보면 단순하고 멍청해보이기까지 한다. AJAX 가 도입되면서 전통적인 웹 프로그램에 조금씩 수정이 가해지고 있는데 이번장에서는 지금까지 배운 내용만을 토대로 두개의 select box 값이 파라미터가 되어 매칭되는 결과를 동적으로 보여주는 예제를 소개하기로 한다.

사실 AJAX 를 사용하지 않더라도 이런 효과는 이전에도 가능했다. select box 의 value 값과 매칭결과를 한꺼번에 받아 hidden 요소나 혹은 다른 방식으로 웹페이지에 저장했다가 사용자의 입력에 따라 그 부분만 취사선택해서 보여주면 된다. 하지만 이경우 데이타가 많아지면 페이지 로딩시간이 지연되고 사용자가 급증할수록 서버에 무리가 갈 것이다. 그리고 일반적으로 클라이언트 보다는 서버 머신의 성능이 월등하므로 많은 데이터를 서버로부터 한꺼번에 받아서 브라우저에서 스크립팅언어로 데이터를 분석해서 보여주는 것은 역시 비효율적이다.

따라서 이번에는 사용자의 입력이 있을때마다 비동기 방식으로 서버에 접속해 그 결과를 바로 알 수 있는 예제를 살펴보자. AJAX 의 가장 큰 장점 중의 하나는 역시 전체 페이지 로딩이 필요 없다는 것이다. 물론 전체 페이지 로딩이 필요한 경우도 있지만, 그렇지 않은 경우에도 전체 페이지가 로딩된다는 것은 결국 서버와 클라이언트 모두 불필요한 작업을 계속 해야 된다는 것을 의미한다. 서버쪽 비지니스로직 프로그램을 해본 개발자는 잘 알 것이다. 서버의 성능을 판단하는 지표중에 TPS 라고 있다. 프로젝트를 진행하면서 구현이 끝나면 전체 성능 및 로드 테스트를 진행하는데 1 TPS 올리는 것이 얼마나 어려운지 안 해본 사람은 모를 것이다. 자원을 좀더 효율적으로 사용해보자. 그리고 좀 더 스마트하게 웹기술을 적용하게 보자.


<!DOCTYPE html PUBLIC "-//W3C//DTD XHTML 1.0 Strict//EN"
  "http://www.w3.org/TR/xhtml1/DTD/xhtml1-strict.dtd">
<html xmlns="http://www.w3.org/1999/xhtml">
<head>
<title>Dynamically Filling Lists</title>

<script type="text/javascript">
var xmlHttp;

function createXMLHttpRequest() {
    if (window.ActiveXObject) {
        xmlHttp = new ActiveXObject("Microsoft.XMLHTTP");
    }
    else if (window.XMLHttpRequest) {
        xmlHttp = new XMLHttpRequest();
    }
}
   
function refreshModelList() {
    var make = document.getElementById("make").value;
    var modelYear = document.getElementById("modelYear").value;

    if(make == "" || modelYear == "") {
        clearModelsList();
        return;
    }
   
    var url = "RefreshModelList?"
        + createQueryString(make, modelYear) + "&ts=" + new Date().getTime();
       
    createXMLHttpRequest();
    xmlHttp.onreadystatechange = handleStateChange;
    xmlHttp.open("GET", url, true);
    xmlHttp.send(null);
}

function createQueryString(make, modelYear) {
    var queryString = "make=" + make + "&modelYear=" + modelYear;
    return queryString;
}
   
function handleStateChange() {
    if(xmlHttp.readyState == 4) {
        if(xmlHttp.status == 200) {
            updateModelsList();
        }
    }
}

function updateModelsList() {
    clearModelsList();
   
    var models = document.getElementById("models");
    var results = xmlHttp.responseXML.getElementsByTagName("model");
    var option = null;
    for(var i = 0; i < results.length; i++) {
        option = document.createElement("option");
        option.appendChild(document.createTextNode(results[i].firstChild.nodeValue));
        models.appendChild(option);
    }
}

function clearModelsList() {
    var models = document.getElementById("models");
    while(models.childNodes.length > 0) {
        models.removeChild(models.childNodes[0]);
    }
}
</script>
</head>

<body>
  <h1>Select Model Year and Make</h1>
 
  <form action="#">
    <span style="font-weight:bold;">Model Year:</span>
    <select id="modelYear" onchange="refreshModelList();">
        <option value="">Select One</option>
        <option value="2006">2006</option>
        <option value="1995">1995</option>
        <option value="1985">1985</option>
        <option value="1970">1970</option>
    </select>
   
    <br/><br/>
    <span style="font-weight:bold;">Make:</span>
    <select id="make" onchange="refreshModelList();">
        <option value="">Select One</option>
        <option value="Chevrolet">Chevrolet</option>
        <option value="Dodge">Dodge</option>
        <option value="Pontiac">Pontiac</option>
    </select>
   
    <br/><br/>
    <span style="font-weight:bold;">Models:</span>
    <br/>
    <select id="models" size="6" style="width:300px;">
   
    </select>
 
  </form>

</body>
</html>

<dynamicLists.html 의 전체 소스>


package ajaxbook.chap4;

import java.io.*;
import java.util.ArrayList;
import java.util.Iterator;
import java.util.List;

import javax.servlet.*;
import javax.servlet.http.*;

public class RefreshModelListServlet extends HttpServlet {

    private static List availableModels = new ArrayList();
   
    protected void processRequest(HttpServletRequest request, HttpServletResponse response)
    throws ServletException, IOException {
        response.setContentType("text/html;charset=UTF-8");
       
        int modelYear = Integer.parseInt(request.getParameter("modelYear"));
        String make = request.getParameter("make");
       
        StringBuffer results = new StringBuffer("<models>");
        MakeModelYear availableModel = null;
        for(Iterator it = availableModels.iterator(); it.hasNext();) {
            availableModel = (MakeModelYear)it.next();
            if(availableModel.modelYear == modelYear) {
                if(availableModel.make.equals(make)) {
                    results.append("<model>");
                    results.append(availableModel.model);
                    results.append("</model>");
                }
            }
        }
        results.append("</models>");
       
        response.setContentType("text/xml");
        response.getWriter().write(results.toString());
    }
   
    protected void doGet(HttpServletRequest request, HttpServletResponse response)
    throws ServletException, IOException {
        processRequest(request, response);
    }
   
    public void init() throws ServletException {
        availableModels.add(new MakeModelYear(2006, "Dodge", "Charger"));
        availableModels.add(new MakeModelYear(2006, "Dodge", "Magnum"));
        availableModels.add(new MakeModelYear(2006, "Dodge", "Ram"));
        availableModels.add(new MakeModelYear(2006, "Dodge", "Viper"));
        availableModels.add(new MakeModelYear(1995, "Dodge", "Avenger"));
        availableModels.add(new MakeModelYear(1995, "Dodge", "Intrepid"));
        availableModels.add(new MakeModelYear(1995, "Dodge", "Neon"));
        availableModels.add(new MakeModelYear(1995, "Dodge", "Spirit"));
        availableModels.add(new MakeModelYear(1985, "Dodge", "Aries"));
        availableModels.add(new MakeModelYear(1985, "Dodge", "Daytona"));
        availableModels.add(new MakeModelYear(1985, "Dodge", "Diplomat"));
        availableModels.add(new MakeModelYear(1985, "Dodge", "Omni"));
        availableModels.add(new MakeModelYear(1970, "Dodge", "Challenger"));
        availableModels.add(new MakeModelYear(1970, "Dodge", "Charger"));
        availableModels.add(new MakeModelYear(1970, "Dodge", "Coronet"));
        availableModels.add(new MakeModelYear(1970, "Dodge", "Dart"));

        availableModels.add(new MakeModelYear(2006, "Chevrolet", "Colorado"));
        availableModels.add(new MakeModelYear(2006, "Chevrolet", "Corvette"));
        availableModels.add(new MakeModelYear(2006, "Chevrolet", "Equinox"));
        availableModels.add(new MakeModelYear(2006, "Chevrolet", "Monte Carlo"));
        availableModels.add(new MakeModelYear(1995, "Chevrolet", "Beretta"));
        availableModels.add(new MakeModelYear(1995, "Chevrolet", "Camaro"));
        availableModels.add(new MakeModelYear(1995, "Chevrolet", "Cavalier"));
        availableModels.add(new MakeModelYear(1995, "Chevrolet", "Lumina"));
        availableModels.add(new MakeModelYear(1985, "Chevrolet", "Cavalier"));
        availableModels.add(new MakeModelYear(1985, "Chevrolet", "Chevette"));
        availableModels.add(new MakeModelYear(1985, "Chevrolet", "Celebrity"));
        availableModels.add(new MakeModelYear(1985, "Chevrolet", "Citation II"));
        availableModels.add(new MakeModelYear(1970, "Chevrolet", "Bel Air"));
        availableModels.add(new MakeModelYear(1970, "Chevrolet", "Caprice"));
        availableModels.add(new MakeModelYear(1970, "Chevrolet", "Chevelle"));
        availableModels.add(new MakeModelYear(1970, "Chevrolet", "Monte Carlo"));

        availableModels.add(new MakeModelYear(2006, "Pontiac", "G6"));
        availableModels.add(new MakeModelYear(2006, "Pontiac", "Grand Prix"));
        availableModels.add(new MakeModelYear(2006, "Pontiac", "Solstice"));
        availableModels.add(new MakeModelYear(2006, "Pontiac", "Vibe"));
        availableModels.add(new MakeModelYear(1995, "Pontiac", "Bonneville"));
        availableModels.add(new MakeModelYear(1995, "Pontiac", "Grand Am"));
        availableModels.add(new MakeModelYear(1995, "Pontiac", "Grand Prix"));
        availableModels.add(new MakeModelYear(1995, "Pontiac", "Firebird"));
        availableModels.add(new MakeModelYear(1985, "Pontiac", "6000"));
        availableModels.add(new MakeModelYear(1985, "Pontiac", "Fiero"));
        availableModels.add(new MakeModelYear(1985, "Pontiac", "Grand Prix"));
        availableModels.add(new MakeModelYear(1985, "Pontiac", "Parisienne"));
        availableModels.add(new MakeModelYear(1970, "Pontiac", "Catalina"));
        availableModels.add(new MakeModelYear(1970, "Pontiac", "GTO"));
        availableModels.add(new MakeModelYear(1970, "Pontiac", "LeMans"));
        availableModels.add(new MakeModelYear(1970, "Pontiac", "Tempest"));
    }

    private static class MakeModelYear {
        private int modelYear;
        private String make;
        private String model;
       
        public MakeModelYear(int modelYear, String make, String model) {
            this.modelYear = modelYear;
            this.make = make;
            this.model = model;
        }
    }
}

<RefreshModelListServlet.java 의 전체 소스>

사실 위 샘플예제 또한 솔직히 추가적인 설명은 하지 않겠다. 만일 자바를 모르는 사람이라면 서버쪽 프로그램의 코드 하나하나를 이해하려고 할 필요는 없을 듯 싶다. 핵심은 ajax 이다. 이번 예제의 서버 프로그램이 길어지게 된 이유는, 사실 비지니스 로직에서는 DB 데이터를 분석하여 매칭되는 결과를 브라우저로 보내줘야 하지만 그렇게 되면 서버 프로그램이 더 복잡해지므로 샘플의 단순화를 위해 좀 무식하게 작성하였다.

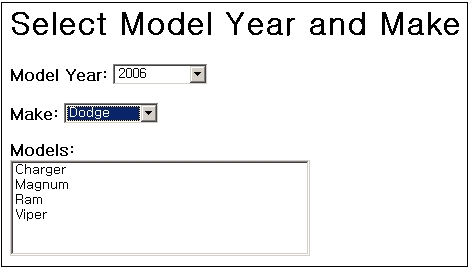
사용자 삽입 이미지

<연도와 제조회사 선택여부에 따라서 맨 아래 모델 종류가 동적으로 바뀌는 화면>


Posted by 캠퍼스친구
홈페이지 관련/ajax2007. 1. 26. 23:37

웹 프로그래밍에서는 브라우저의 요청에 응답을 해야 한다. 정상적인 응답이든 비정상이든 브라우저는 그 결과를 표시한다. 이번 주제는 AJAX 를 이용하여 서버의 상태만을 확인해 볼 수 있는 방법을 제시하고자 한다. 서버의 상태를 확인하기 위해서는 특정 리소스 url 로 요청을 보내면 된다. 하지만 서버는 응답정보를 브라우저에 보내게 되는데, 이럴경우에 응답정보의 모든 부분이 필요하지는 않는다. 단지 헤더정보만 얻을 수 있으면 서버의 상태를 파악할 수 있다.

지금까지 XMLHttpRequest 객체의 open(method, url, asynch) 메소드의 method 에는 GET 및 POST 만을 사용했었다. 하지만 HEAD 을 사용하면, 즉 브라우저가 HEAD 요청을 보내면, HEAD 요청을 받은 서버는 응답을 보낼때 body 의 내용은 빼버리고 헤더 정보만 채워서 보내게 된다. 따라서 오고가는 정보의 양이 극히 줄기때문에 브라우저에서 시간간격으로 서버의 상태를 점검하는데 아주 유용하게 사용할 수 있다.

이번 주제의 예제를 살펴보자.

<!DOCTYPE html PUBLIC "-//W3C//DTD XHTML 1.0 Strict//EN"
  "http://www.w3.org/TR/xhtml1/DTD/xhtml1-strict.dtd">
<html xmlns="http://www.w3.org/1999/xhtml">
<head>
<title>Reading Response Headers</title>

<script type="text/javascript">
var xmlHttp;
var requestType = "";

function createXMLHttpRequest() {
    if (window.ActiveXObject) {
        xmlHttp = new ActiveXObject("Microsoft.XMLHTTP");
    }
    else if (window.XMLHttpRequest) {
        xmlHttp = new XMLHttpRequest();
    }
}
   
function doHeadRequest(request, url) {
    requestType = request;
    createXMLHttpRequest();
    xmlHttp.onreadystatechange = handleStateChange;
    xmlHttp.open("HEAD", url, true);
    xmlHttp.send(null);
}
   
function handleStateChange() {
    if(xmlHttp.readyState == 4) {
        if(requestType == "allResponseHeaders") {
            getAllResponseHeaders();
        }
        else if(requestType == "lastModified") {
            getLastModified();
        }
        else if(requestType == "isResourceAvailable") {
            getIsResourceAvailable();
        }
    }
}

function getAllResponseHeaders() {
    alert(xmlHttp.getAllResponseHeaders());
}

function getLastModified() {
    alert("Last Modified: " + xmlHttp.getResponseHeader("Last-Modified"));
}

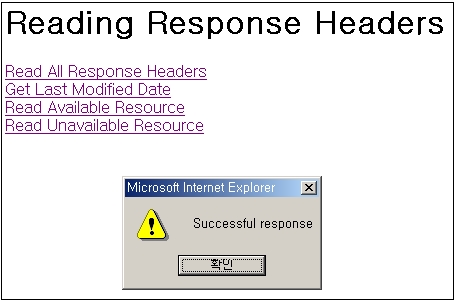
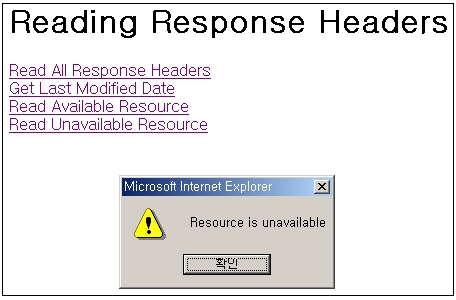
function getIsResourceAvailable() {
    if(xmlHttp.status == 200) {
        alert("Successful response");
    }
    else if(xmlHttp.status == 404) {
        alert("Resource is unavailable");
    }
    else {
        alert("Unexpected response status: " + xmlHttp.status);
    }
}

</script>
</head>

<body>
  <h1>Reading Response Headers</h1>
 
  <a href="javascript:doHeadRequest('allResponseHeaders', 'readingResponseHeaders.xml');">Read All Response Headers</a>
 
  <br/>
  <a href="javascript:doHeadRequest('lastModified', 'readingResponseHeaders.xml');">Get Last Modified Date</a>
 
  <br/>
  <a href="javascript:doHeadRequest('isResourceAvailable', 'readingResponseHeaders.xml');">Read Available Resource</a>
 
  <br/>
  <a href="javascript:doHeadRequest('isResourceAvailable', 'not-available.xml');">Read Unavailable Resource</a>

</body>
</html>

<readingResponseHeaders.html 의 전체 소스>


<?xml version="1.0" encoding="UTF-8"?>

<readingResponseHeaders>

</readingResponseHeaders>

<readingResponseHeaders.xml 의 전체 소스>

지금까지 GET 혹은 POST 방식만을 사용해 예제를 작성했던 생각을 떠올려 볼때 이번 예제의 유일한 차이점은 xmlHttp.open("HEAD", url, true); 이다. HEAD 는 서버에 요청을 보낼때 HEAD 요청을 보내는 것으로 요청을 받은 서버는 body 의 정보를 아무것도 채우지 않고 단지 헤더 정보만을 넣어서 브라우저로 보내게 되다.

의심이 간다면 readingResponseHeaders.xml 파일에 내용을 채운후 아래와 같이 코드를 수정해서 실행해보자.

function getAllResponseHeaders() {
    alert(xmlHttp.getAllResponseHeaders());
    alert(xmlHttp.responseText);
    alert(xmlHttp.responseXML.getElementsByTagName("readingResponseHeaders")[0].firstChild.nodeValue);
}

첫번째 alert() 만 헤더정보를 표시하고 두번째, 세번째는 아무런 아무런 값도 없을 것이다.(open 메소드의 HEAD 를 GET 으로 수정한 후 다시 실행해 보면 두번째, 세번째 모두 값을 출력할 것이다.)

따라서 서버의 상태만을 점검하는 것이라면 HEAD 요청을 사용하는 것이 브라우저와 서버간 오고가는 데이터의 양이 매우 적어지기 때문에 서버에 부하를 최소화 하는 방식이라고 하겠다.


사용자 삽입 이미지

<서버의 응답정보 중 헤더정보만을 표시한 그림>


사용자 삽입 이미지

<서버의 헤더정보중 Last-Modified 항목에 대한 값>


사용자 삽입 이미지
 
<XHR 객체의 state 상태가 200 일 경우>
 
 
참고로 XHR 객체의 state 의 값이 200 이면 정상적인 서버 응답종료를 의미한다. 404는 해당 서버 리소스 url 이 존재하지 않음을 의미한다. 500이면 서버가 해당 요청을 수행하다가 내부적으로 에러가 발생했음을 의미한다.

사용자 삽입 이미지

<XHR 객체의 state 상태가 404 일 경우>

Posted by 캠퍼스친구