전통적인 웹 프로그램의 경우 추가 프로세스는 다음과 같이 진행된다.
1. 전체 리스트를 조회하는 화면에서 추가 버튼 클릭
2. 추가할 항목의 세부사항을 입력받을 화면
3. 입력을 마치면 저장 버튼
4. 입력이 정상적으로 끝났다는 화면 혹은 맨 처음 전체 리스트 화면.
이것처럼 추가 프로세스를 구현하기 위해서 항목을 입력받는 페이지를 추가로 구현해야 한다. 하지만 ajax 를 이용하여 한 페이지 내에서 모든 것을 다 구현할 수 있다. 추가 프로세스가 진행되고 난 후 필요한 부분만 refresh 되는 건 당연하다. ajax 를 이용해서 추가로직만 구현해본 예제를 살펴보자.
그럼 해당 소스코드를 살펴보자.
<!DOCTYPE html PUBLIC "-//W3C//DTD XHTML 1.0 Strict//EN"
"http://www.w3.org/TR/xhtml1/DTD/xhtml1-strict.dtd">
<html xmlns="http://www.w3.org/1999/xhtml">
<head>
<title>Employee List</title>
<script type="text/javascript">
var xmlHttp;
var name;
var title;
var department;
var deleteID;
var EMP_PREFIX = "emp-";
function createXMLHttpRequest() {
if (window.ActiveXObject) {
xmlHttp = new ActiveXObject("Microsoft.XMLHTTP");
}
else if (window.XMLHttpRequest) {
xmlHttp = new XMLHttpRequest();
}
}
function addEmployee() {
name = document.getElementById("name").value;
title = document.getElementById("title").value;
department = document.getElementById("dept").value;
action = "add";
if(name == "" || title == "" || department == "") {
return;
}
var url = "EmployeeList?"
+ createAddQueryString(name, title, department, "add")
+ "&ts=" + new Date().getTime();
createXMLHttpRequest();
xmlHttp.onreadystatechange = handleAddStateChange;
xmlHttp.open("GET", url, true);
xmlHttp.send(null);
}
function createAddQueryString(name, title, department, action) {
var queryString = "name=" + name
+ "&title=" + title
+ "&department=" + department
+ "&action=" + action;
return queryString;
}
function handleAddStateChange() {
if(xmlHttp.readyState == 4) {
if(xmlHttp.status == 200) {
updateEmployeeList();
clearInputBoxes();
}
else {
alert("Error while adding employee.");
}
}
}
function clearInputBoxes() {
document.getElementById("name").value = "";
document.getElementById("title").value = "";
document.getElementById("dept").value = "";
}
function deleteEmployee(id) {
deleteID = id;
var url = "EmployeeList?"
+ "action=delete"
+ "&id=" + id
+ "&ts=" + new Date().getTime();
createXMLHttpRequest();
xmlHttp.onreadystatechange = handleDeleteStateChange;
xmlHttp.open("GET", url, true);
xmlHttp.send(null);
}
function updateEmployeeList() {
var responseXML = xmlHttp.responseXML;
var status = responseXML.getElementsByTagName("status").item(0).firstChild.nodeValue;
//var status = responseXML.getElementsByTagName("status")[0].firstChild.data;
status = parseInt(status);
if(status != 1) {
return;
}
var row = document.createElement("tr");
var uniqueID = responseXML.getElementsByTagName("uniqueID")[0].firstChild.nodeValue;
row.setAttribute("id", EMP_PREFIX + uniqueID);
row.appendChild(createCellWithText(name));
row.appendChild(createCellWithText(title));
row.appendChild(createCellWithText(department));
var deleteButton = document.createElement("input");
deleteButton.setAttribute("type", "button");
deleteButton.setAttribute("value", "삭제");
deleteButton.onclick = function () { deleteEmployee(uniqueID); };
var cell = document.createElement("td");
cell.appendChild(deleteButton);
row.appendChild(cell);
document.getElementById("employeeList").appendChild(row);
updateEmployeeListVisibility();
}
function createCellWithText(text) {
var cell = document.createElement("td");
cell.appendChild(document.createTextNode(text));
return cell;
}
function handleDeleteStateChange() {
if(xmlHttp.readyState == 4) {
if(xmlHttp.status == 200) {
deleteEmployeeFromList();
}
else {
alert("Error while deleting employee.");
}
}
}
function deleteEmployeeFromList() {
//var status = xmlHttp.responseXML.getElementsByTagName("status").item(0).firstChild.nodeValue;
var status = xmlHttp.responseXML.getElementsByTagName("status")[0].firstChild.data;
status = parseInt(status);
if(status != 1) {
return;
}
var rowToDelete = document.getElementById(EMP_PREFIX + deleteID);
var employeeList = document.getElementById("employeeList");
employeeList.removeChild(rowToDelete);
updateEmployeeListVisibility();
}
function updateEmployeeListVisibility() {
var employeeList = document.getElementById("employeeList");
if(employeeList.childNodes.length > 0) {
document.getElementById("employeeListSpan").style.display = "";
}
else {
document.getElementById("employeeListSpan").style.display = "none";
}
}
</script>
</head>
<body>
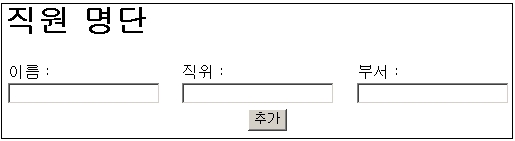
<h1>직원 명단</h1>
<form action="#">
<table width="80%" border="0">
<tr>
<td>이름 : <input type="text" id="name"/></td>
<td>직위 : <input type="text" id="title"/></td>
<td>부서 : <input type="text" id="dept"/></td>
</tr>
<tr>
<td colspan="3" align="center">
<input type="button" value="추가" onclick="addEmployee();"/>
</td>
</tr>
</table>
</form>
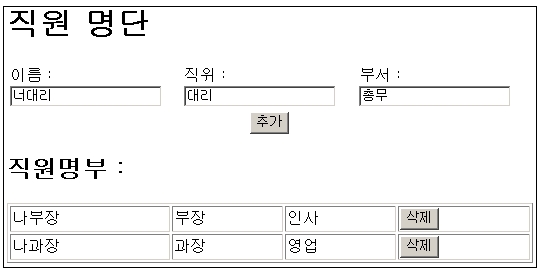
<span id="employeeListSpan" style="display:none;">
<h2>직원명부 : </h2>
<table border="1" width="80%">
<tbody id="employeeList"></tbody>
</table>
</span>
</body>
</html>
<employeeList.html 의 모든 소스 코드>
package ajaxbook.chap4;
import java.io.*;
import java.net.*;
import java.util.Random;
import javax.servlet.*;
import javax.servlet.http.*;
public class EmployeeListServlet extends HttpServlet {
protected void addEmployee(HttpServletRequest request, HttpServletResponse response)
throws ServletException, IOException {
//Store the object in the database
String uniqueID = storeEmployee();
//Create the response XML
StringBuffer xml = new StringBuffer("<result><uniqueID>");
xml.append(uniqueID);
xml.append("</uniqueID>");
xml.append("<status>1</status>");
xml.append("</result>");
//Send the response back to the browser
sendResponse(response, xml.toString());
}
protected void deleteEmployee(HttpServletRequest request, HttpServletResponse response)
throws ServletException, IOException {
String id = request.getParameter("id");
/* Assume that a call is made to delete the employee from the database */
//Create the response XML
StringBuffer xml = new StringBuffer("<result>");
xml.append("<status>1</status>");
xml.append("</result>");
//Send the response back to the browser
sendResponse(response, xml.toString());
}
protected void doGet(HttpServletRequest request, HttpServletResponse response)
throws ServletException, IOException {
String action = request.getParameter("action");
if(action.equals("add")) {
addEmployee(request, response);
}
else if(action.equals("delete")) {
deleteEmployee(request, response);
}
}
private String storeEmployee() {
/* Assume that the employee is saved to a database and the
* database creates a unique ID. Return the unique ID to the
* calling method. In this case, make up a unique ID.
*/
String uniqueID = "";
Random randomizer = new Random(System.currentTimeMillis());
for(int i = 0; i < 8; i++) {
uniqueID += randomizer.nextInt(9);
}
return uniqueID;
}
private void sendResponse(HttpServletResponse response, String responseText)
throws IOException {
response.setContentType("text/xml");
response.getWriter().write(responseText);
}
}
<EmployeeListServlet.java 의 모든 소스 코드>
위 예제에 대한 소스를 보면 쉽게 알겠지만 직원의 정보를 입력하고 추가 버튼을 누르면 파라미터 쿼리 스트링을 생성해서 GET/비동기 방식으로 서버로 보낸다. 서버에서는 해당 정보를 DB 에 insert 가상 로직을 수행하고 그 결과를 XML 로 만들어서 클라이언트로 전송한다. XHR 객체는 해당 XML 정보로 부터 정보를 다시 추출하고 테이블에 추가하는 형태의 흐름으로 전개된다. 삭제 로직도 추가 로직과 거의 비슷하게 동작한다.
위 예제중에 한가지 살펴볼 것이 있다.
deleteButton.onclick = function () { deleteEmployee(uniqueID); };
이 부분의 코드를 다음과 같이 사용할 수도 있을 것이다.
deleteButton.setAttibute("onclick", "deleteEmployee('"+uniqueID+"');");
하지만 IE 및 FireFox 두개의 브라우저에서 제대로 작동을 하지 않았다. 하지만 다행히 처음코드를 사용하면 모두 정상적으로 잘 작동 하였다. AJAX 를 사용하면서 가장 큰 골치거리가 바로 이런 코드이다. 하루빨리 W3C 표준을 구현하도록 브라우저 전영에도 각성이 촉구된다.
